How to Migrate from Weebly to WordPress

If you've been using Weebly for quite some time, but you decided to migrate your website to WordPress it is possible and you don't need to hire a developer or write a single line of code to do that. There is a Weebly importer tool that can do all the work for you and in the following lines, you will learn how to do it step by step.
Here's a general guide to help you with the migration process: Backup Your Weebly Content: Export your content from Weebly, including text, images, and other media. Weebly usually provides an export option that generates a ZIP file containing your website's HTML, CSS, and media files. Choose a WordPress Hosting Provider: Select a reliable WordPress hosting provider and set up a new WordPress website. Some popular options include ScalaHosting, SiteGround, and Ultahost.
  1. Install WordPress: Install WordPress on your chosen hosting platform. Most hosting providers offer a simple one-click installation process.
  2. Select a Theme: Choose a WordPress theme that closely matches the design of your Weebly website. You may need to customize the theme to achieve the desired look.
  3. Install Necessary Plugins: Install and activate plugins that will help with the migration process, such as an import/export plugin and any additional functionality you need.
  4. Import Content: Use a plugin like "FG Joomla to WordPress" or "All-in-One WP Migration" to import your Weebly content. Follow the plugin's instructions to ensure a proper transfer of pages, posts, images, and other media.
  5. Recreate Design and Layout: Replicate your Weebly design and layout using the chosen WordPress theme. This may involve configuring menus, widgets, and customizing page templates.
  6. Update Internal Links: Update any internal links that may have changed during the migration. Ensure that all links within your content point to the correct pages on your new WordPress site.
  7. Set Up SEO: Configure SEO settings using a plugin like Yoast SEO to maintain or improve your website's search engine rankings. Optimize page titles, meta descriptions, and other SEO elements.
  8. Test and Review: Thoroughly test your WordPress website to ensure that all content, images, and functionalities are working as expected. Check for any broken links or missing content.
  9. Domain and DNS Settings: If you're using the same domain name, update your domain's DNS settings to point to your new WordPress hosting server.
  10. Launch Your WordPress Site: Once you're satisfied with the migration and testing, make your new WordPress site live by updating your domain settings and removing any "under construction" notices.
  11. Monitor and Optimize: Continuously monitor your WordPress site's performance, fix any issues that arise, and consider optimizing for speed and security.
Remember that migrating a website involves technical details, so it's advisable to have some familiarity with WordPress and website management. If you're not comfortable with the process, you might consider hiring a professional developer or agency to assist with the migration.
-73%

1. ScalaHosting

Number of Reviews rating circle 2k+
Avg. Review Rating rating circle 4.9 Positive
Customer Support rating circle Positive
Starts from $2.95 / mo.
Server Locations
Server Location in United States Of AmericaServer Location in BulgariaServer Location in United KingdomServer Location in FranceServer Location in GermanyServer Location in SingaporeServer Location in AustraliaServer Location in JapanServer Location in South KoreaServer Location in Canada
NOW -81%

2. SiteGround

Number of Reviews rating circle 16.9k+
Avg. Review Rating rating circle 4.7 Positive
Customer Support rating circle Positive
Starts from $3.25 / mo.
Server Locations
Server Location in BulgariaServer Location in United States Of AmericaServer Location in United KingdomServer Location in SpainServer Location in NetherlandsServer Location in GermanyServer Location in AustraliaServer Location in Singapore
Flash Sale -%

3. Ultahost

Number of Reviews rating circle 927
Avg. Review Rating rating circle 4.7 Positive
Customer Support rating circle Positive
Starts from $2.90 / mo.
Server Locations
Server Location in GermanyServer Location in United States Of AmericaServer Location in CanadaServer Location in NetherlandsServer Location in TurkeyServer Location in IndiaServer Location in SingaporeServer Location in FranceServer Location in United KingdomServer Location in Indonesia

Getting Started

To migrate your Weebly website to WordPress, you should first develop your WordPress website and you will need to get two things – web hosting and a domain name. The web hosting offers the physical machine that will store your website’s files, and the domain name is the name of your website, for example, yoursite.com.
Once you get your hosting and domain name by any hosting provider, you should look for a WordPress App installer, or install WordPress manually on your hosting account. If you are not familiar with the installation process, take a look at our article:  A Beginner’s Guide How To Install WordPress on Shared Hosting. Once you install WordPress on your hosting account, you are ready to proceed to the next step, which is to move your Weebly content to WordPress.

How To Export Weebly Content

Nowadays, it is very easy to export all of your content from Weebly and transfer it into a WordPress compatible format, that can be imported. The process will not make any changes to your existing website, so it is safe to use.
To do that, go to Weebly to WordPress website which is a free tool that imports all of your content from Weebly and converts it into a format that is suitable for WordPress.

weebly import image

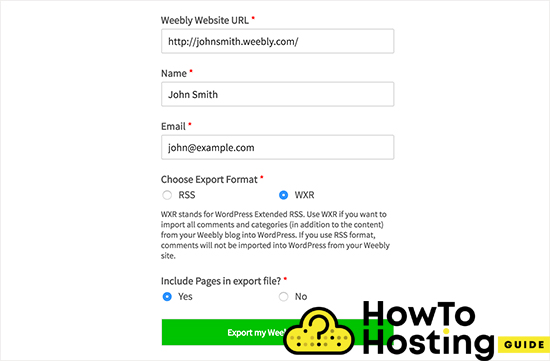
You should provide your name, mail, and select the format of the export. You should choose the WXR format unless you face an issue.

Next, you have to choose whether you want your pages to be included in the export file. The default option for that is Yes, and you don’t need to make any changes unless you don’t want to export your Weebly pages.
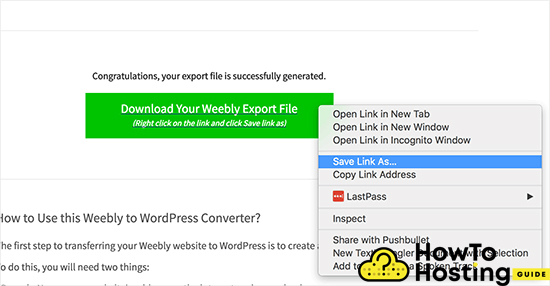
Then, the Weebly importer will create a WordPress compatible file that you can download.

download export image

How To Import Weebly Content Into WordPress

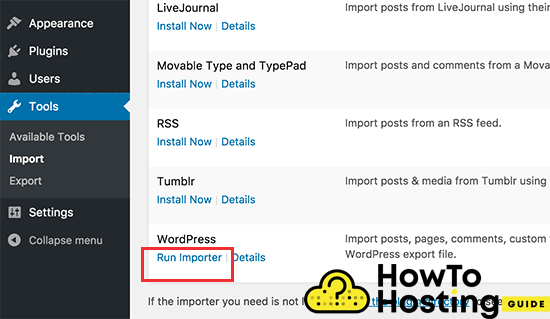
After you have successfully exported your Weebly content into a WordPress compatible file, you are ready to import it to your WordPress website. To do that, go to the admin dashboard of your WordPress website and click on Tools, then select Import.

Wordpress importer image

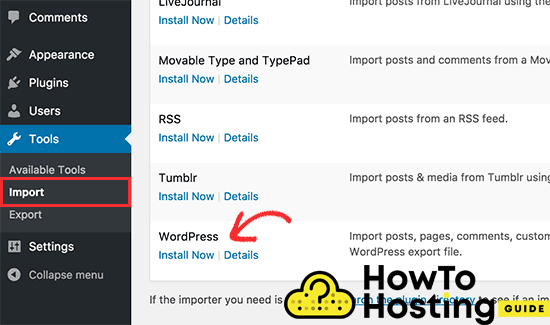
WordPress will install the importer plugin in your WordPress site and once installed you can click the Run Importer button to start it.

importer running image

This will open up your importer page, and you should click on the Choose File button, and find the export.xml file that you’ve downloaded a while ago. Then, click on the “Upload file and import” button to continue.
The process might take some time depending on the size of your file, and after WordPress analyzes it, on the next screen you will be asked to assign authors.

import settings image

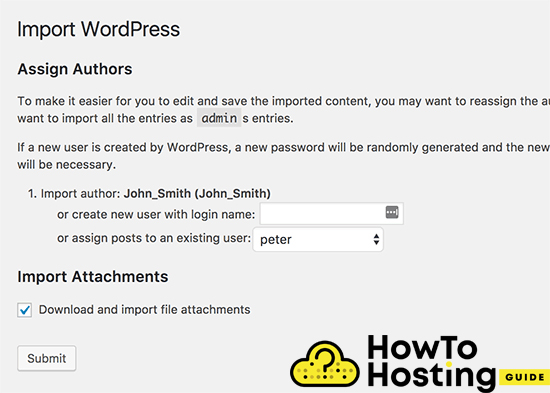
You can either import your authors from your Weebly website or create a new author and assign all of the content to him. 

Make sure that you check the box next to “Download and import file attachments”, because it will bring all of your images straight to your WordPress media library, and you will be able to use them later.
After you are done with that, click on the submit button to run the importer.

After a while, you should see a success message, that looks just like that:

success message image

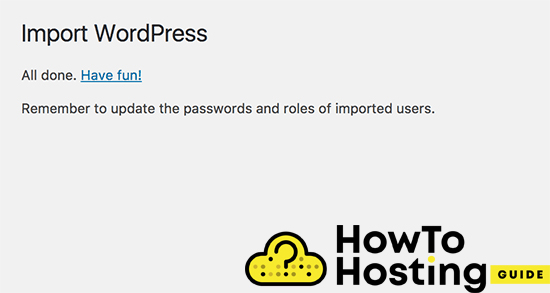
If this window pops up, you’ve successfully imported all of your Weebly content to WordPress. Now, you can go to your posts, pages, or categories and check the existing content there. Also, make sure to check the Media library, to ensure that all of your images were imported correctly.

If for some reason the process fails and doesn’t finish to its end, you can always run it again without any problems. The importer itself detects existing content and will not duplicate it but skip it.

Configuring Redirects

If you were using a personal domain for your Weebly website, for example, “Mysite.com”, you will need to point it straight to your hosting provider.

To do that, you need to login to your Weebly account first and go to the Domains page, where you should click on the domain name that you wish to edit, then find the domain settings page and click on the change button. 
On the next screen, you will have to enter your nameservers. Which are different for every hosting provider, but for the purpose of the tutorial we use the Bluehost’s which are ns1.bluehost.com and ns2.bluehost.com. 

domain change image

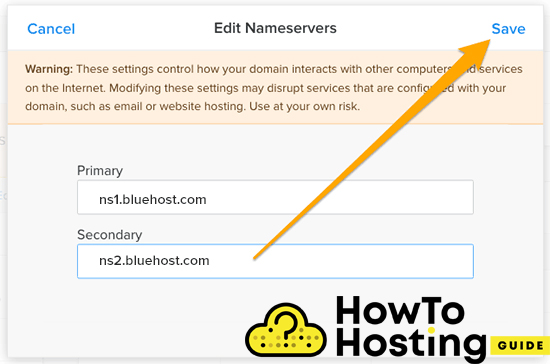
Click on the Save button to save your settings. Have in mind that the update of your nameservers might take up to 24 hours depending on your hosting provider.
If you are using a subdomain on your Weebly account, then the redirects can be done in the following way:
Login in to your Weebly dashboard and edit your website. Click on the Settings menu and then select the SEO tab.
Then, scroll down to the header code and then write

<meta http-equiv="refresh" content="0;url=http://www.yourdomain.com/">

and replace yourdomain.com with your WordPress site’s name. Click save and publish and now your Weebly website will redirect your users to your WordPress website.
Setting up Permalinks
It is quite possible that your Weebly link structure is different from your blog posts and that might cause some 404 errors. To fix that, go to your Settings, then click on Permalinks, and scroll down until you see the Custom Structure option and then add /blog/%postname% next to it. 

permalink image

Don’t forget to click save and your permalinks will be updated.

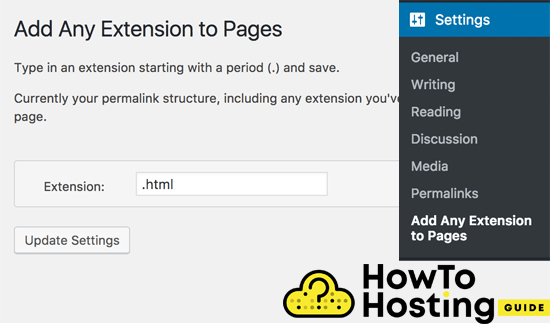
After that, all you have to do is to add .html to the end of all WordPress pages URL addresses. To do that, you can use a plugin, such as 

Add Any Extention to Pages. Install it and activate it and add .html to its settings and then click Update Settings.

HTML adding image

Researched and created by:
Krum Popov
Passionate web entrepreneur, has been crafting web projects since 2007. In 2020, he founded HTH.Guide — a visionary platform dedicated to streamlining the search for the perfect web hosting solution. Read more...
Technically reviewed by:
Metodi Ivanov
Seasoned web development expert with 8+ years of experience, including specialized knowledge in hosting environments. His expertise guarantees that the content meets the highest standards in accuracy and aligns seamlessly with hosting technologies. Read more...

Leave a Comment

Your email address will not be published. Required fields are marked *

This site is protected by reCAPTCHA and the Google Privacy Policy and Terms of Service apply.

This website uses cookies to improve user experience. By using our website you consent to all cookies in accordance with our Privacy Policy.
I Agree
At HTH.Guide, we offer transparent web hosting reviews, ensuring independence from external influences. Our evaluations are unbiased as we apply strict and consistent standards to all reviews.
While we may earn affiliate commissions from some of the companies featured, these commissions do not compromise the integrity of our reviews or influence our rankings.
The affiliate earnings contribute to covering account acquisition, testing expenses, maintenance, and development of our website and internal systems.
Trust HTH.Guide for reliable hosting insights and sincerity.