On This Page: [hide]
Aruba is a leading company in Italy providing web hosting, data centers, and domain registration services. The company was found in 1994 and it has over 5.4 million customers, 16 million users, 2,7 million registered and managed domains, and offers easy ways of installing and integrating WordPress.
Aruba Hosting Profile
| Targeting Locations | France, UK,Germany, Czech Republic, Slovakia, Poland, Hungary |
| Price Range | Hosting 11,99 € per month; WordPress+Woocomerce 24.99 € /month; Domain 0.99 € per year, E-Commerce 39.00 € per year / |
| Products | Hosting Plans, WordPress hosting, E-Commerce, Cloud Hosting, Domains |
| Support | 24/7 online support |
| Suitable for | WordPress, e-Commerce, Web Marketing, Custom solutions |
Before starting your WordPress installation on Aruba, you have to buy a hosting plan and a domain to obtain access to the Aruba Control Panel.
Once you register on their site you have to log in. You can do it from here.
The log-in information is immediately sent to your inbox when you finish your purchase. Then enter your username and password and hit the enter button.
To Install WordPress on Aruba.it, click on the Control Panel button, then go to install WordPress, choose the hosting section, and then click “Softaculous App Installer“. Then find the WordPress icon and the Install button.
Also Read Install WordPress With PuTTy and FileZilla (Steps)
Configuring The Database
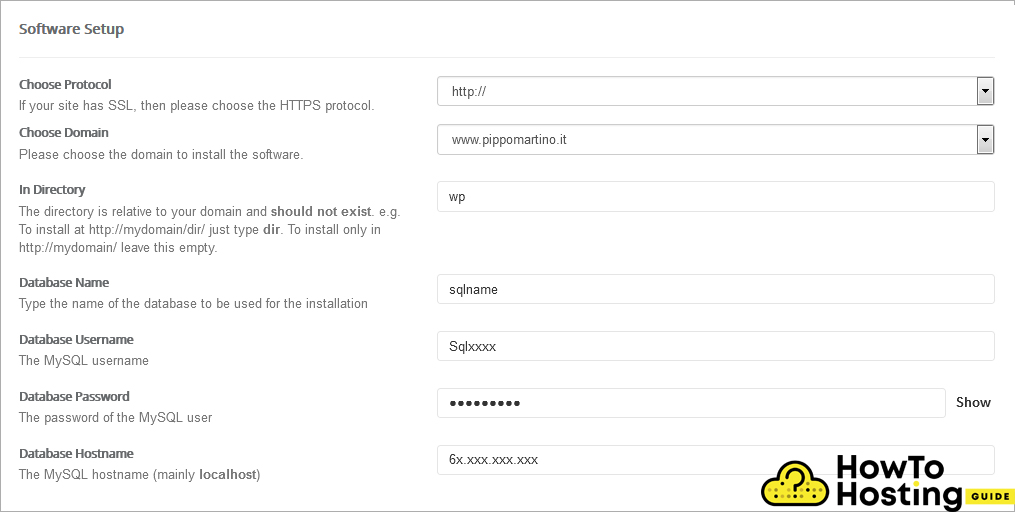
The next important step of your WordPress configuration is to set up your database. To do so you need to connect your domain to the right database. To do so, use the drag-and-drop menu and choose on which domain you want to install your WordPress.
Leave the “Directory” field as it is, and then enter your database date.
Pay attention to the “wp” text that might be found inside the “in directory“, or you might install the WordPress in another folder that is not the main folder of your domain.
The information relating to your database can be found in the email that Aruba.it sent you.
Configuring Admin Account
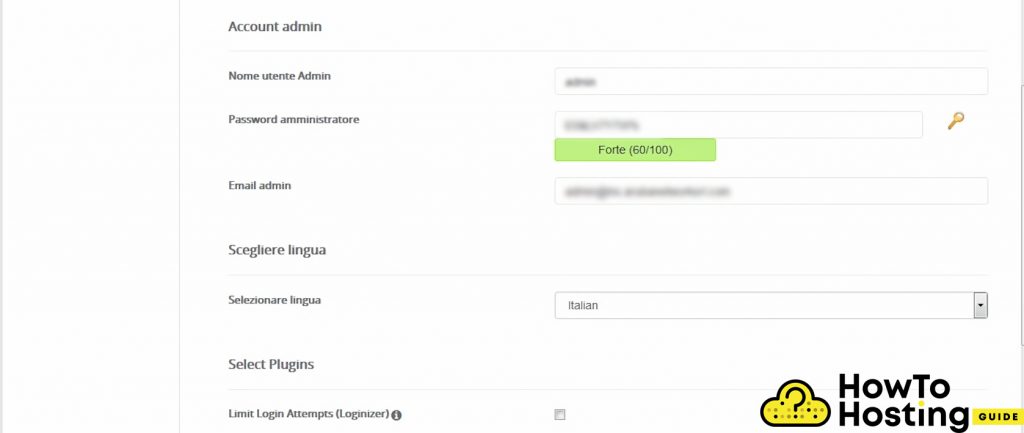
Once you are done with these steps, scroll down to the Admin Account section, and create your admin account – username, password, and email.
Then, all you have to do is to choose your language and for extra security, you can click on the “Limit Login Attempts“.
Re-check if all of your information is correct and click on the Install button and wait for your WordPress installation to be done.
Once it is done, go to yourdomain.com/wp-admin and you can log in with your admin account and start building your WordPress site.


