
On This Page: [hide]
Joomla is one of the most famous content management systems all over the world. Just like WordPress and the other CMS systems, it is very easy to set up and launch. In this installation guide, we are going to show you How to Install Joomla on Siteground.
Also Read How to Install Facebook Pixel On Joomla
How to Install Joomla on Siteground
The installation process of a new Joomla website starts with the download of the installation package. We highly recommend that you download the files from the official website of Joomla – downloads.joomla.org.
Once you download the installation package on your hard drive, find the file, and extract it to a new folder.
After you extract the files, you will have to upload them to your webserver. The easiest way to do that is with any FTP client. You can use FileZilla to achieve that.
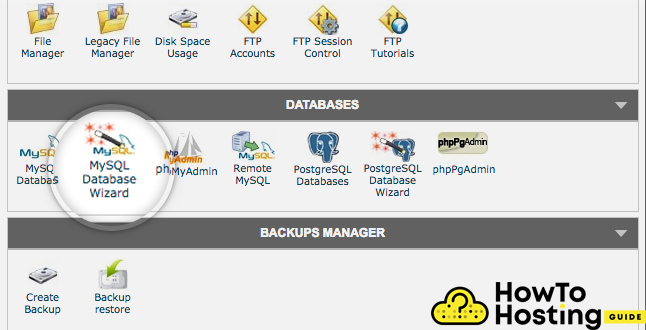
Create a Database for Joomla
You will also need to set up a database for your website and assign it with full permissions, so it can work as expected. To do that click on the MySQL Database Wizzard.
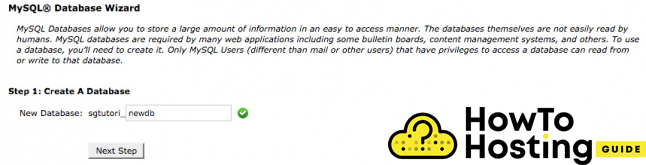
On the next page, you will see details regarding your database and its name. It always starts with a prefix, so you have to set your database name to whatever you want. Once you do that, click on the Next Step button.
On the next page, you will have to fill details regarding your database username and password. The prefix for your username is always the cPanel username.
Write down your password and reenter it and click “Create user“.
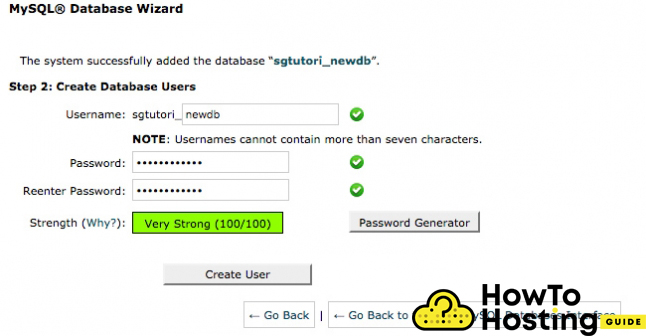
Then you will see a tab with “ALL PRIVILEGES“, mark all of them, and click on the Next Step button. Then you should see a success message.
Proceed With Installation
After you’ve successfully created your database, you can proceed with the installation process. Simply navigate to your domain, for example, mydomain.com or if you’ve uploaded your Joomla files in a folder named Joomla, it will be mydomain.com/joomla, and then you will see the installation screen of Joomla that looks just like that:
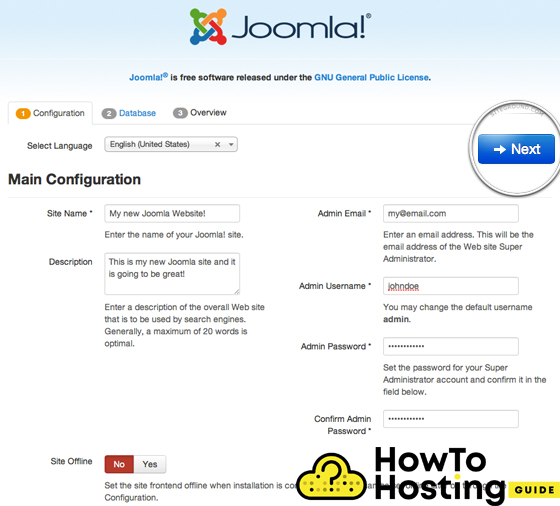
For Site Name, you should enter the name of your website. Most of the templates of Joomla use this for the first heading of your main page.
Description: It represents a brief description of your website and it might or might not be displayed on your public part of the website depending on your theme.
Admin Email: Here you should enter a valid and secure email that is going to be used by administrators. It also can receive password recovery messages.
Admin Password: Set a secure password because that is crucial for your website security.
Site Offline: You can select whether your website should be offline after the installation is completed. This option should be used while you still develop the website.
On the next screen, you will see lots of information regarding your database.
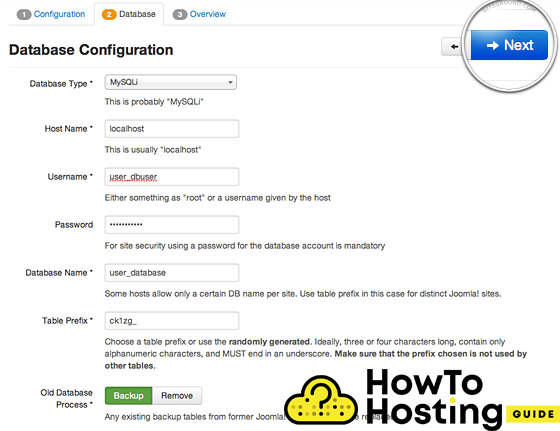
Database type: By default, it should be set to MySQLi, and you should not really touch it.
Hostname: Leave it to the localhost, which is the default value.
Username: Write down your database username.
Password: The password for the database username.
Table Prefix: Joomla uses its own prefix for all of its database tables. It is useful on some occasions, and you should not really change it. Just leave it as it is.
Old Database Process: If you already have an existing database, you can choose what to happen with the existing tables. We recommend using the backup option before going any further and then click on the Next button so you can proceed.
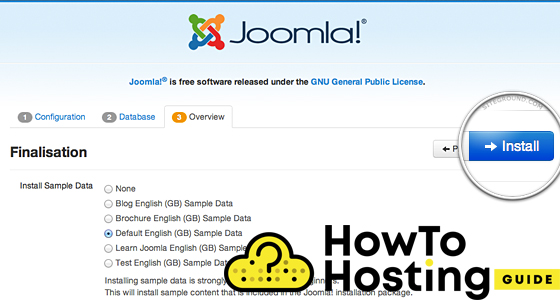
After that, you will be forwarded to the last page of the Joomla installation process, where you can specify if you want any sample data to be used on your website and server. For beginners, we would recommend using the Default Sample data option, since it will do the most casual things needed for the building of a new website.
Then, click on the Install button.
After a few minutes, your Joomla website will be installed and you can log in and start building your content.