On This Page: [hide]
Selecting the right platform for your website is more vital than ever. WordPress, a leader in website content management systems, offers a broad range of features and benefits that stand out.
Whether you’re establishing an online presence for a small business, launching an eCommerce platform, or beginning a personal blog, WordPress provides a solid foundation that supports your online journey. Its awesome flexibility, combined with user-friendly tools, makes it the top choice for millions of website owners worldwide.
Why Choose WordPress for Your Website in 2025
Choosing WordPress as your Content Management System (CMS) unlocks a host of advantages aimed at enhancing your website’s effectiveness and user experience. Its reputation for offering an easy-to-use interface allows even those with minimal technical skills to create and manage a professional-looking website. Below, we explore the key benefits that make WordPress the preferred choice for web development in 2025.
- Vast Customization Options: With thousands of themes and plugins at your disposal, WordPress lets you design your site to reflect your unique style and meet your specific needs. Whether you’re aiming for a minimalist blog or a feature-rich online store, WordPress’s extensive library supports your vision without requiring custom coding.
- User-Friendly for Beginners and Experts Alike: WordPress’s intuitive dashboard makes website management straightforward. From posting content to changing themes, its user-friendly interface ensures a smooth experience for beginners, while still offering advanced features for seasoned developers.
- SEO-Friendly Structure: WordPress is designed with search engine optimization in mind. Its codebase enables search engines to easily index your content, improving your site’s visibility and driving more organic traffic your way.
- Scalability: As your website grows, WordPress grows with you. It’s built to handle increasing amounts of traffic and content, ensuring that your site performs well, no matter how large it becomes.
- Strong Security Features: Website security is critical in protecting your data and your users’ information. WordPress continually updates its software to guard against the latest security threats, helping keep your site safe. In addition, numerous security plugins are available to further strengthen your site’s defenses.
- Community Support: WordPress boasts an extensive global community of users and developers. This community offers invaluable resources, from forums and tutorials to specialized plugins, ensuring you have the support you need to tackle any challenge.
WordPress stands out as a comprehensive tool for website creation and management, offering flexibility, ease of use, and a wide range of features. Its adaptability makes it ideal for various types of websites, from personal blogs to large e-commerce platforms. Dive into WordPress, and see how its benefits can elevate your online presence in 2025 and beyond.
Step 1: Select a Reliable Hosting Service

Choosing the right hosting service is crucial for getting your WordPress website online. Your choice should not only fulfill your current website requirements but also accommodate your site’s potential growth. A good hosting service ensures your website is always accessible, loads quickly, and provides a secure environment for your visitors.
What Makes Bluehost the Preferred WordPress Hosting Provider?
Bluehost stands out as a favored choice within the WordPress community for several reasons. First and foremost, its ease of integration with WordPress itself makes setting up your website straightforward. With features like one-click WordPress installation, it simplifies the technical aspects of getting your site up and running. Bluehost also offers a free domain name for the first year, which is an attractive proposition for new website owners looking to minimize startup costs.
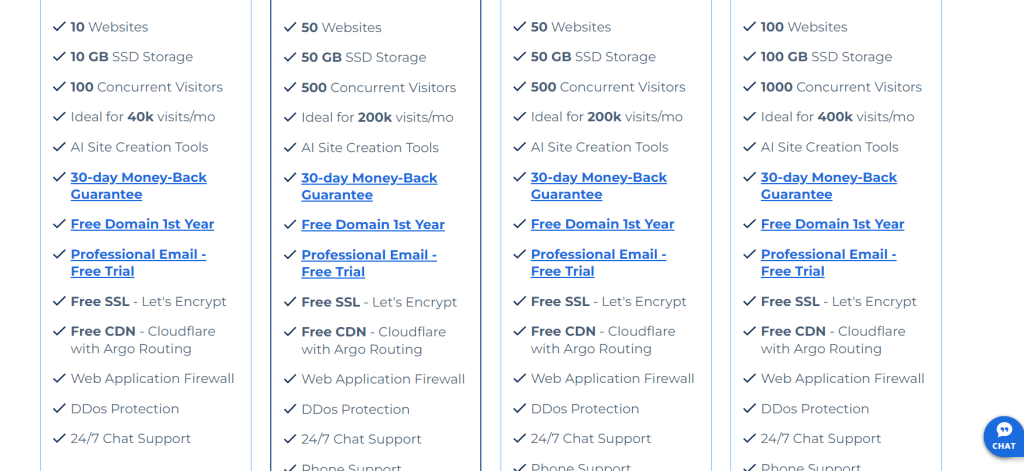 Features of BlueHost’s Web Hosting
Aside from cost savings, Bluehost provides a dependable service characterized by impressive uptime and customer support. This ensures your website remains operational and any issues can be swiftly addressed.
For those concerned about website security, Bluehost includes features like free SSL certificates for the first year, enhancing your site’s security from the get-go. Lastly, its ability to scale means that as your website grows, you can move to more robust hosting plans without the need for switching providers.
Alternatives to Bluehost: Finding the Right Fit for Your Project
While Bluehost is highly recommended, especially for WordPress websites, it’s essential to consider other reliable hosting services to find the best fit for your specific needs.
Alternative hosting providers such as GoDaddy and InMotion Hosting also offer WordPress compatibility, along with various hosting plans to suit different website sizes and traffic volumes.
GoDaddy, for instance, is known for its user-friendly interface and extensive domain name management tools, making it a good option for beginners. InMotion Hosting, on the other hand, offers excellent scalability and performance for growing websites, with a focus on speed and reliability.
When choosing a hosting provider, you should assess the following aspects:
- Compatibility with WordPress to ensure smooth integration and operation.
- Cost-effectiveness, considering not only initial pricing but also renewal rates.
- Customer support availability to help you troubleshoot any issues.
- Uptime guarantees that ensure your website is always accessible to visitors.
- Security features to protect your website and visitors’ data.
Considering these factors will help you select a hosting service that not only meets your current needs but also supports your long-term website goals. Whether you choose Bluehost or an alternative provider, ensure they offer the right mix of features, support, and scalability to match the demands of your WordPress website.
Step 2: Registering Your Domain Name

After you’ve brainstormed and gathered ideas for your website, the next crucial step is registering your domain name. This is a pivotal moment in establishing your online presence, as your domain name serves as the digital address for your brand. It’s the gateway for users to access your site, and it reflects your business identity. Here’s a simple guide to ensure you secure the perfect domain name for your site.
How to Choose and Buy the Perfect Domain Name for Your Site
Choosing the right domain name is like naming a child. It requires thought and consideration since it plays a critical role in your website’s identity. The perfect domain name is not just a label; it’s your brand’s digital signature. Let’s walk through some steps to guide you along this journey:
- Keep It Short and Memorable: Your domain name should be short, simple, and memorable. Consider how easily your audience can remember and type your domain name. Long or complicated names might be forgotten or mistyped.
- Avoid Numbers and Hyphens: Numbers and hyphens can often be misunderstood when spoken. They can also complicate the typing process. For simplicity and clarity, stick to letters.
- Use Keywords Wisely: Incorporating keywords related to your business can improve your search engine rankings and attract relevant traffic. However, balance is key. Ensure your domain name reflects your brand without stuffing it with keywords.
- Choose the Right Domain Extension: While the .com domain is the most recognized, don’t shy away from considering other top-level domains (TLDs) like .net, .org, or even niche extensions like .shop, .blog, or .tech. This could be an opportunity to stand out and clearly communicate your website’s purpose.
- Check for Availability: Use a domain name generator and check the availability of your chosen name. These tools can also suggest variations and available extensions if your first choice is taken.
- Consider Your Brand: Your domain name is an extension of your brand. Make sure it aligns with your brand values, is easy to pronounce, and free from unwanted connotations.
- Act Quickly: Domain names are unique, and once taken, you might not have the chance to claim it again. If you find the perfect domain name, don’t hesitate to register it.
Purchasing your domain name is a straightforward process. Once you’ve chosen a provider, you can register your domain often for a minimal annual fee. Many hosting services offer the first year of domain registration for free with a hosting plan, which can be a cost-effective way to get both your domain and hosting from the same provider.
Step 3: Install WordPress on Your Host

Installing WordPress on your hosting server is a critical step towards launching your website. This process can vary slightly depending on your hosting provider but generally involves a straightforward setup that can be accomplished in a few minutes.
For beginners, utilizing your hosting’s auto-installer is the easiest method. However, for those who prefer a more hands-on approach or wish to understand the inner workings of WordPress installations, manual installation is also an option. Whichever method you choose, the goal is to successfully deploy WordPress, setting the stage for your website’s development.
Detailed Guide to Installing WordPress on Bluehost
Bluehost, recommended by WordPress, simplifies the installation process for its users.
After logging into your Bluehost Hosting Dashboard, navigate to the Marketplace and select ‘Add Website’. You’ll be prompted to enter the necessary details about your website. Proceed to choose the domain where you want WordPress installed. Following these steps, WordPress will be automatically installed on your chosen domain in about 5 minutes. Bluehost has tailored its services for optimal WordPress performance, including free SSL and enhanced security measures to safeguard your site.
How to Install WordPress Manually for Advanced Users
Advanced users may prefer the manual installation of WordPress to get a deeper understanding of its setup and customization options. This process involves several steps, including preparing a database, uploading WordPress files, and configuring the wp-config.php file. While more complex, this method offers flexibility and a sense of accomplishment.
Preparing the Database for a Fresh WordPress Installation
Begin by creating a new MySQL database through the cPanel’s MySQL Databases option. You’ll be prompted to name your database; remember this name, as you’ll need it for future steps. Creating a user and granting it all privileges to this database is also necessary, ensuring WordPress can store and retrieve your site’s data effectively.
Uploading WordPress Files through FTP or File Manager
With your database ready, the next step involves uploading WordPress files to your server. After downloading the latest version of WordPress from wordpress.org, unzip the file. You can upload these files to your server using an FTP client like FileZilla or through the cPanel’s File Manager, usually into the public_html directory. This step lays down the WordPress foundation on your server.
The Easiest Way to Install WordPress Locally on Your Computer
Installing WordPress locally on your computer is an excellent way to explore WordPress without affecting a live site. This setup, available only to you, allows for experimentation with themes, plugins, and updates. Tools like WAMP, XAMPP, or Local by Flywheel facilitate this process on various operating systems. Whether you’re on Windows or macOS, these tools offer a simple way to run WordPress in a sandbox environment, enabling you to learn and test new features in a secure, private setting.
Installing WordPress on Shared Hosting With Softaculous
Softaculous is a very popular auto-installer, that is used for installing popular applications such as WordPress. It is offered by famous hosting companies such as InMotion Hosting and Siteground, and you can install WordPress with it very easily.
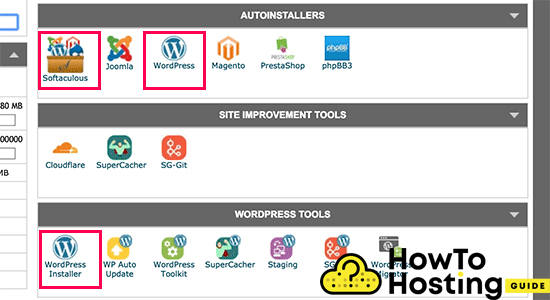
All you have to do is to log in your cPanel account. Find the Softaculous app or the WordPress installer Icon. Click on the icon, and launch the Softaculous auto-installer for WordPress. You will see an overview of WordPress and you will be asked for some details such as Site name, Site description, Admin account, and Password.
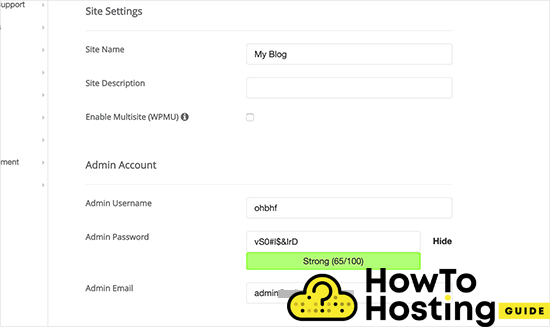
Once you are ready click on the Install button on the bottom of the page. When the progress bar hits 100% you will see a success message and you can log into YourDomain.com/wp-admin and start building your WordPress website.
Installing WordPress With Quickinstall
QuickInstall is yet another very popular auto-installer that is used and offered by many hosting companies. For the purpose of our tutorial, we are using the QuickInstall option of Hostgator’s cPanel. But it is the same with every other hosting provider.
The first thing that you have to do is to log into your cPanel and scroll down until you find the Sofware section and click on the QuickInstall icon.
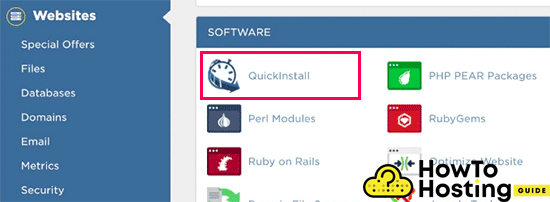
This will take you to another page, where you will see one-click installers, where you can spot the WordPress icon. Just click on that icon and then click the “Install WordPress” button.
You will be asked for some information regarding your blog title and admin details, fill them and click on the Install button.
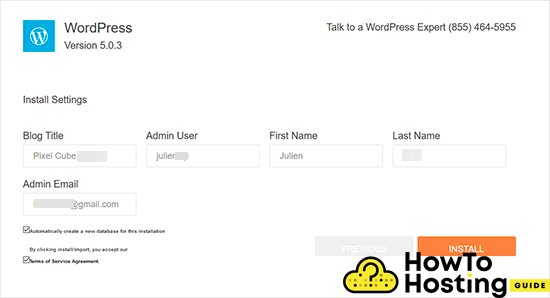
Once the installation is completed you will see a success message and you can click on the “Login button” to log into your website.
Installing WordPress using Fantastico
Fantastico is another auto-installer that is used by some WordPress hosting providers, it is very similar to the other installers and it also offers an easy way to install WordPress.
You should first login to your cPanel dashboard and from the Software, section find and click on the Fantastico icon.
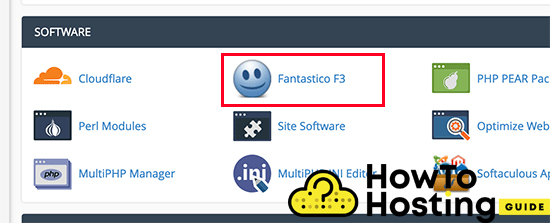
Then scroll down among all of the applications that you will see, find the WordPress, and click on the “Install Button“.
It will again ask you for some details such as username, password, email, site title, and subdirectory.
If you want to install your WordPress in your mail domain directory, for example, yoursite.com leave it blank, but if you want to have a separate directory for your installation, enter it and then hit the submit button to continue.
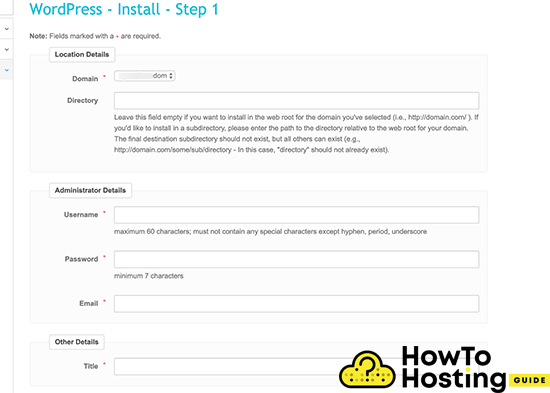
The Fantastico app will now install WordPress for you and once it finishes you will see a success message. Afterward, you can log into your website with the admin details that you’ve already specified.
Installing WordPress With FTP
WordPress can be installed via FTP as well. It is pretty easy too. The first thing that you need to do is to install an FTP software, such as FileZilla for example, (or any other it does not really matter). Then, go to the official WordPress website and download the last release. Then, unzip your archive in your folders, log into your FTP account with the FTP software that you use and select all of the WordPress files and upload them straight to the public_html folder. (this is your root folder)
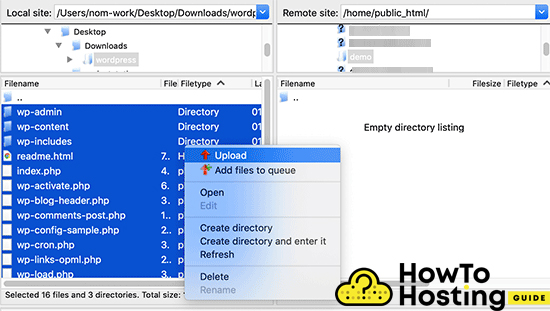
If you do that, your WordPress installation will be accessible, when someone types the URL of your domain.
If you want your WordPress installation to be in another folder for some reason, create a folder for example /test/ in your public_html and extract the files there. Then it will be accessible by yourdomain.com/test/.
Once you are done with uploading your files you will have to create your database. The shared hostings usually offer a MySQL database that you can create straight from their cPanel.

You will see a field to create a new database, enter your database name, and click “create“.
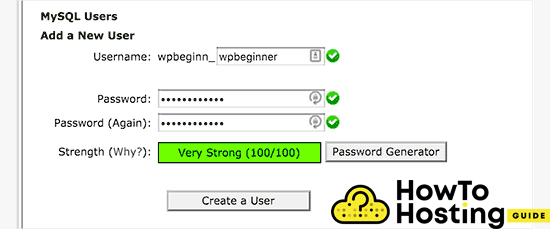
On the MySQL database page, scroll down until you see the users section. Simply create your user by typing username and a password and click on the create user button.
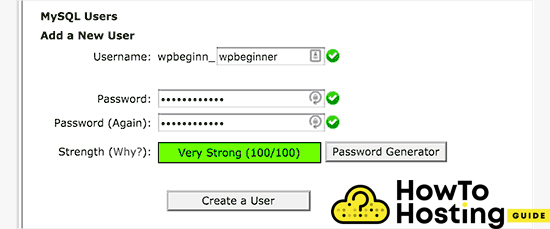
Then, scroll down until you find the “Add a user to a Database” and select your user and your database.
Select “All Privileges” to allow all of the privileges to the user and click on the make changes button. Then all you have to do is to type your domain and hit the enter button. You will be asked to choose the language of your WordPress site, then type your database name, username, password, and host.
Then click on the “Run the installation” button and just wait until the WordPress is installed.
Step 4: Selecting Your WordPress Theme

Choosing the right theme for your WordPress website is like selecting the perfect attire for a grand event. It sets the first impression, showcases your style, and determines the comfort level of your guests—the visitors to your site. When you navigate to your WordPress dashboard, under Appearance, you’ll find a plethora of themes to choose from. Each theme serves as a foundation for your website’s design, layout, and overall aesthetic.
The Difference Between Free and Premium WordPress Themes
The journey of selecting the ideal WordPress theme often leads to a crossroads: deciding between free and premium options. Both paths offer distinct advantages tailored to different needs, budgets, and aspirations.
- Free WordPress Themes: The official WordPress theme directory is a treasure trove of free themes that are accessible directly within your WordPress admin dashboard. These themes are a cost-effective way to start your online presence, especially if you’re working with a tight budget.
Free themes are rigorously reviewed and approved by the WordPress community, ensuring they meet a standard of coding practices and a minimal level of quality. However, the customization options and the level of support might be limited compared to their premium counterparts.
- Premium WordPress Themes: On the other side of the spectrum are premium themes available on marketplaces like ThemeForest. Premium themes typically come with a price tag but offer extensive customization options, unique designs, and advanced functionality.
They often include dedicated support from the theme developers, which can be invaluable for troubleshooting or when you want to extend your site’s capabilities. Premium themes are suited for those willing to invest a bit more for a tailored, distinctive online presence that stands out from the crowd.
When making your choice, consider not just the visual appeal but also the theme’s responsiveness—its ability to adapt and look great on devices of all sizes. Review the theme description, demo, and customer reviews to understand its features, usability, and quality. Remember, the theme you choose will lay the foundation for your visitor’s experience, so it’s important to select one that aligns with your vision and objectives for your website.
Step 5: Add Essential Plugins for Your WordPress Site
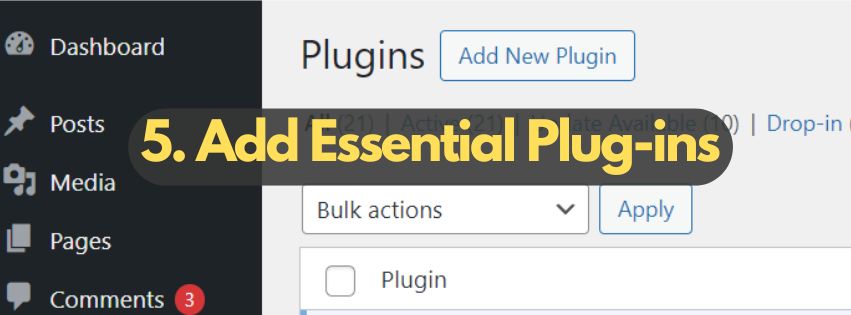
When enhancing your WordPress site, leveraging the right plugins can significantly bolster both functionality and security. Essential plugins serve as the backbone for optimizing performance, improving SEO, and safeguarding against threats. Through thoughtful selection, these tools work seamlessly to elevate your site’s capabilities, ensuring a robust and user-friendly experience for your visitors. Let’s explore the must-have categories of plugins every WordPress site owner should consider incorporating in 2025.
Must-Have WordPress Plugins for Every Website in 2025
Empowering your WordPress site starts with integrating plugins that cater to varying needs—from security enhancements to SEO optimizations. Here are the critical types of plugins to include:
- Security Plugins: These plugins are your first line of defense, offering features like firewalls, malware scanning, and protection against brute-force login attempts. A secure site builds trust with your audience and protects sensitive data.
- SEO Plugins: To rank well on search engines, SEO plugins are indispensable. They help you with keyword optimization, generating sitemaps, and improving on-page SEO elements like metatags and titles.
- Performance Optimization: Speed and efficiency are crucial for user satisfaction and SEO. Plugins in this category help cache your site’s content, compress images, and minify CSS and JavaScript files, ensuring your site loads quickly.
- Social Sharing Plugins: Amplify your content’s reach by making it easy for visitors to share your posts and pages on their social media networks. This not only enhances engagement but also helps in driving more traffic to your site.
Step 6: Creating Your First Content on WordPress
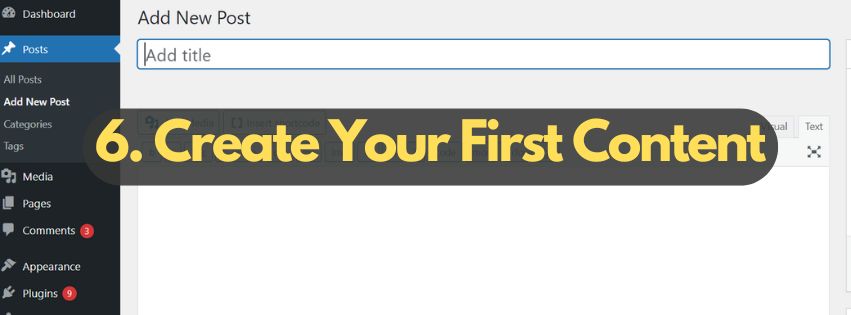
Beginning your journey with WordPress is an exhilarating step towards establishing your online presence. Whether you’re aiming to share your insights through a blog or provide information about your small business, content creation is at the core of a vibrant and effective website. Let’s dive into the basics of setting up your homepage and adding your first posts and pages, keeping simplicity and accessibility in mind.
Setting Up Your Homepage and Blog
Your homepage is often the first point of interaction for your visitors, so making a strong impression is crucial. WordPress allows you to customize what your visitors first see—be it a static page that introduces your site or a dynamic page that displays your latest blog posts. To set this up:
- Go to your WordPress dashboard, and select ‘Settings’ > ‘Reading’.
- Under ‘Your homepage displays’, choose either ‘Your latest posts’ or ‘A static page’.
- If selecting ‘A static page’, choose which existing page you want as your homepage.
- Save your changes and view your site to ensure it reflects your choice.
For blog enthusiasts aiming to engage and grow an audience, ensuring your blog page is accessible and appealing is just as important as your homepage. Using a responsive theme that supports blogs will make this process smoother, allowing readers to easily find and enjoy your content.
Adding Pages and Posts: A Beginner’s Tutorial
Expanding your website with more content is essential for engagement and SEO. With WordPress, you have two primary types of content: posts and pages. Here’s how to add them to your site:
Creating a Page:
- In your WordPress dashboard, hover over ‘Pages’ and click ‘Add New’.
- Enter a title for your page, such as ‘About Us’ or ‘Contact’.
- Add your content in the editor. Here, you can include text, images, and videos to enrich your page.
- When you’re pleased with the content, click ‘Publish’ to make the page live on your site.
Creating a Post:
- Navigate to ‘Posts’ on your dashboard and select ‘Add New’.
- Title your post and begin crafting content in the editor. Posts are great for news updates, blog articles, and more dynamic content.
- Organize your post using categories and tags for better navigation.
- Preview your post, and once everything looks good, hit ‘Publish’.
Both pages and posts are vital for a diverse and engaging website. Pages provide essential information about your business or personal brand, while posts keep your audience updated and engaged with fresh, relevant content. Visual elements such as images, videos, and infographics are key to breaking up text and making your content more accessible and enjoyable. By keeping your paragraphs short and using subheadings, you make it easier for readers to scan your content and find what interests them.
Customizing Your WordPress Site
Personalizing your WordPress site is an essential step towards creating a distinctive online presence that captivates and engages your audience. WordPress, with its flexible framework, offers numerous options to tailor your site fitting your brand’s character and vision.
Whether you’re setting up a blog, a business webpage, an online store, or a portfolio, customizing your WordPress site can transform a standard template into a unique space on the internet that speaks volumes about what you represent.
How to Use the WordPress Customizer for Site Personalization
The WordPress Customizer is a powerful tool designed to simplify the process of customizing your site. Accessible directly from your WordPress dashboard, it presents an organized, live-preview interface to adjust various elements without needing to touch a line of code.
Let’s walk through how to leverage the WordPress Customizer for personalizing your website effectively.
Accessing the Customizer: To start, navigate to your WordPress dashboard, look for the ‘Appearance’ section, and click on ‘Customize.’ This action opens the customizer with a live preview of your current theme, allowing you to see the changes as you make them in real time.
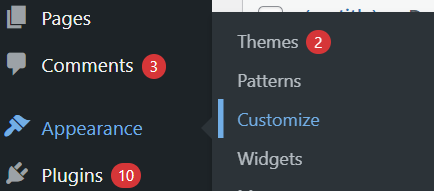
Site Identity: Begin with the basics; update your site’s title, tagline, and logo. These elements are foundational to your site’s identity, helping visitors recognize your brand at a glance. Opt for a logo that is clear, memorable, and aligns with your brand ethos. Remember, consistency in these elements across all your digital platforms strengthens your brand recognition.
Colors and Fonts: Colors and typography play a crucial role in setting the mood and conveying your brand’s personality. Use the customizer to explore different color palettes that reflect your brand’s values and emotions you wish to evoke. Similarly, choose fonts that are readable and represent your brand’s style. Most themes offer a range of typefaces from which you can select the one that best suits your needs.
Layout and Background: Whether you prefer a grid layout, a single column, or something more complex, the layout section allows you to structure your content in a way that best displays it. Moreover, adding a background image or color can significantly impact your site’s look and feel, making it more engaging and aligned with your visual branding.
Menus and Widgets: Effective navigation is key to a good user experience. Use the customizer to create intuitive menus that help visitors explore your site with ease. Also, widgets offer functionality and can enhance your site’s usability—add calendars, search bars, or latest posts widgets to improve interactivity and provide quick access to useful information.
Additional CSS: For more specific customizations, the customizer includes an ‘Additional CSS’ section where you can write custom CSS code. This feature is particularly useful for creating unique styles that the theme’s default options might not offer. You can also use Elementor for all those features as it is the most user-friendly customizers for WordPress websites.
As you adjust these settings, the live preview ensures that you only publish the changes once you’re satisfied with the outcome. This real-time feedback loop allows for experimentation without affecting what your visitors currently see.
Improving WordPress Site Performance
Enhancing the performance of a WordPress site is essential for creating a fast, efficient, user-friendly experience. A website that loads quickly and runs smoothly can significantly improve user engagement, reduce bounce rates, and boost your SEO rankings. Here, we’ll explore several strategies to improve your WordPress site’s performance without getting bogged down in technical details.
Optimizing WordPress for Speed and Efficiency
To optimize a WordPress site for speed and efficiency involves a few straightforward actions that can have a big impact. Follow these steps to help your site run smoother and more efficiently:
- Caching: Leveraging caching can drastically reduce your website’s loading times. WordPress caching plugins like W3 Total Cache or WP Super Cache store a static version of your site, cutting down the time it takes to deliver content to your visitors’ browsers. This simple step can make a noticeable difference in speed.
- Image Optimization: Images are often the largest files on a website, contributing to slower load times. Optimizing images by compressing their file size without losing quality can significantly boost site speed. Tools like Smush Image Compression and EWWW Image Optimizer automatically handle this process, making images web-ready as you upload them.
- Minify CSS and JavaScript: CSS and JavaScript files add functionality and design to your site but can also slow it down if not optimized. Minifying these files reduces their size and thus the load time. Plugins like Autoptimize can help you achieve this by streamlining your site’s CSS, HTML, and JavaScript files.
- Content Delivery Network (CDN): A CDN can speed up your website by storing a copy of your site on servers around the world. When someone visits your site, they are served a version from the closest server, which reduces loading times. Integrating a CDN like CloudFlare can dramatically improve your site’s global performance.
- Regular Updates: Keeping WordPress, along with any themes and plugins, updated is crucial for performance and security. Developers regularly release updates that provide new features and fix known issues, including those affecting site speed.
Each of these steps contributes to a more efficient and faster-loading website. Remember, optimizing a WordPress site for speed isn’t just about making it quicker; it’s about creating a better experience for your users. They are more likely to stay, browse, and return to a site that performs well.
Ensuring WordPress Security
WordPress security is vital for safeguarding your site’s integrity, your business’s reputation, and user data. An unsecured website is an invitation to malicious actors, leading to potential data breaches, site downtime, or even total site loss. Central to WordPress site security is taking proactive steps—utilizing strong, unique passwords, keeping your WordPress version, themes, and plugins up-to-date, and incorporating trusted security plugins to monitor and protect your site 24/7.
Backing up your WordPress site is also fundamental. Should the worst occur, a recent backup can be your rescue, allowing for the restoration of your site to its state before the incident. Regular site backups, stored in a secure, remote location, ensure that your digital presence can withstand and quickly recover from any cybersecurity threat.
Key WordPress Security Measures for Every Site Owner
To fortify your WordPress website, start with essential practices like choosing strong passwords and regularly updating them. Integrate two-factor authentication for an added layer of security, safeguarding against unauthorized access. Keep your WordPress core, as well as any themes and plugins, up to date to close any security gaps. An outdated plugin or theme can serve as an easy entry point for hackers.
- Regularly backup your site: Use plugins like UpdraftPlus or BlogVault to schedule automatic backups. This action ensures you can swiftly restore your site if any security issues arise.
- Implement a security plugin: Tools such as Sucuri provide comprehensive security features, including malware scanning and firewall protection, crucial for keeping your site safe.
- Enable a Web Application Firewall (WAF): This serves as a barrier between your site and the internet, filtering out malicious traffic and preventing unauthorized data access.
- Move your site to SSL/HTTPS: This encrypts data transmitted between your website and your users, protecting sensitive information such as login credentials and personal data.
Maintaining Your Site
Maintaining your WordPress site is crucial for ensuring its security, speed, and performance. A well-maintained site not only offers a better user experience but also ranks higher in search engine results. In essence, the effort you put into site maintenance directly impacts your site’s success and longevity. By incorporating regular maintenance tasks into your schedule, you can catch potential issues early, reduce the risk of security breaches, and keep your site running smoothly.
Regular Maintenance Tasks for Site Owners
As the owner of a WordPress site, it’s essential to engage in a series of regular maintenance tasks aimed at preserving the site’s integrity, speed, and security. Below is a simplified list of these tasks, aimed at ensuring your site remains secure, efficient, and user-friendly.
- Backup Your Website: Regularly backup your site to mitigate the risk of data loss due to hacking, system failures, or inadvertent deletions. Use reliable plugins such as UpdraftPlus or BlogVault to schedule automatic backups.
- Update WordPress, Themes, and Plugins: Regularly check for and install updates for WordPress, themes, and plugins. These updates often include security patches and new features that can improve your site’s performance and security.
- Optimize Database: Over time, your WordPress database can become cluttered with unnecessary data, slowing down your site. Use optimization tools or plugins to clean up your database regularly, improving efficiency.
- Scan for Malware and Vulnerabilities: Use security plugins to routinely scan your site for malware, vulnerabilities, or suspicious activities. Early detection of such issues is vital for maintaining your site’s security.
- Check and Repair Broken Links: Broken links can negatively impact your user experience and SEO. Use tools to regularly check for and fix any broken links on your site.
- Review User Access and Permissions: Regularly review who has access to your WordPress site and their permissions. Limit administrative access to trusted individuals to mitigate the risk of unauthorized changes.
- Optimize Performance: Evaluate your site’s loading speed and performance using tools like GTmetrix or Google PageSpeed Insights. Implement recommended optimizations to enhance user experience.
- Review SEO Practices: Regular SEO reviews ensure your site remains visible and ranks well in search engine results. Check for SEO improvements and content updates to stay competitive.
While performing these maintenance tasks requires time and effort, the benefits far outweigh the investment. A well-maintained WordPress site secures your digital presence, enhances user experience, and contributes to your overall online success.
Conclusion
Your journey to building your own WordPress website is now at a thrilling juncture. What began as a vision can now be launched into the digital world, ready to greet visitors. This guide aimed to equip you with the basic knowledge and tools required to create a website that not only meets your needs but also has the potential to grow alongside your business, blog, or personal brand. As you reflect on the steps you’ve taken—from registering a domain name and choosing web hosting, to selecting the perfect WordPress theme and customizing your site—remember that these efforts lay the foundation for your online presence.
WordPress, with its user-friendly interface and vast array of customization options, has enabled you to transform your vision into reality. Whether it’s a blog, an eCommerce store, or a portfolio, the site you have created is uniquely yours. The ability to extend functionality through plugins, manage content efficiently, and engage with your audience through a visually appealing and responsive design, are just a few of the benefits WordPress offers. Now, it’s vital to maintain the momentum. Regularly updating your content, optimizing your site’s performance, and ensuring its security are key to providing a positive user experience that keeps visitors coming back.
Remember, the world of online content is dynamic — stay curious and open to learning. New trends, tools, and opportunities to enhance your site and expand your digital footprint will continue to emerge. Your WordPress site is not just an endpoint, but a beginning. It’s the starting block for your digital adventure, a place where your ideas can grow, evolve, and inspire. Celebrate this accomplishment and look forward to the opportunities that lie ahead.
