
On This Page: [hide]
Most “how to start a Shopify store” guides walk you through clicking buttons. Then you launch, crickets, and wonder what went wrong. This guide covers the complete picture: setup, yes, but also the configuration details that affect whether customers trust you enough to buy, the legal boxes you need to check, and the post-launch actions that actually generate sales.
What this guide covers: A complete walkthrough of launching your Shopify store in 2026, from account creation through your first sale. We include legal requirements most tutorials skip, the new Sidekick AI features, honest pricing breakdowns, essential apps worth the cost, common mistakes that kill conversions, and what to do after launch when you’re staring at zero orders.
Last reviewed: February 2026. Pricing and features verified on official Shopify pages.

Why Shopify Over Traditional Hosting
Traditional VPS ecommerce hosting gives you complete control. You install WooCommerce or Magento, configure your server, manage security updates, and handle everything yourself. More flexibility, more responsibility, more potential for things to break at 2 AM on Black Friday.
Shopify takes the opposite approach. Infrastructure, security, PCI compliance, SSL certificates, automatic backups? All handled. You focus on products and customers. The trade-off is less customization and ongoing subscription costs rather than one-time hosting fees. For most new store owners, the simplicity outweighs those constraints.
If you’re comfortable with technical management and want maximum flexibility, WordPress with WooCommerce might serve you better. For everyone else, Shopify’s managed approach eliminates the barriers that stop most entrepreneurs before they start.
Step 1: Create Your Shopify Account
Head to shopify.com and click “Start free trial.” You don’t need a credit card for the initial setup. Shopify provides a 3-day free trial followed by a USD 1/month promotional period for your first three months. That’s enough time to build, test, and validate your store concept without significant investment.
During signup, you’ll answer questions about your business: what you’re selling, where you’re based, whether you’re already selling elsewhere. Answer honestly. Shopify uses this information to pre-configure features and suggest relevant tools. Skipping through randomly produces a generic setup that requires more manual work later.
Choosing Your Store Name
Your store name becomes part of your default URL (yourstore.myshopify.com) until you connect a custom domain. Pick something that works as a domain name: short, memorable, no special characters. You can change the store name later, but the myshopify.com subdomain stays fixed. If you’re serious about branding, have your custom domain ready before setup.
Step 2: Choose and Customize Your Theme
The Theme Store offers 100+ free and paid options. Free themes like Dawn, Refresh, and Sense handle most use cases well. Premium themes run USD 200 to USD 400 one-time and add features like mega menus, advanced filtering, and unique layouts.
Dawn deserves special mention. It’s Shopify’s default theme and loads 35% faster than older alternatives. The modular section-based design lets you rearrange page elements without touching code. For most new stores, starting with Dawn and customizing beats paying for premium themes you may not need.
Customization Essentials
Access the theme editor through Online Store then Themes then Customize. The interface shows your live site with drag-and-drop editing. Focus on these elements first:
- Logo and colors: Upload your logo, set brand colors that carry through the entire site
- Typography: Pick fonts that match your brand (readable at small sizes, not too decorative)
- Homepage sections: Feature products, collections, testimonials, and your value proposition
- Navigation: Clear menus that help visitors find products quickly
Mobile-first design matters. Over 65% of ecommerce traffic arrives on phones. Preview your changes in mobile view constantly. What looks good on desktop often breaks on smaller screens. Shopify themes are responsive by default, but custom element placement can still create mobile layout issues.
Using Sidekick AI Assistant
One 2026 feature worth knowing: Sidekick. This AI assistant lives in your admin dashboard and understands your store’s context. Ask it questions in plain language. “How do I add a discount code?” “What were my best-selling products last month?” Sidekick answers based on your actual data and can execute tasks directly.
For new store owners, Sidekick functions like having a Shopify expert available around the clock. It won’t replace learning the platform yourself, but it accelerates the process considerably.
Step 3: Add Your Products
Products are your store’s foundation. Navigate to Products then Add product. Each product needs:
- Title: Clear, searchable, includes relevant keywords naturally
- Description: Benefits over features, formatted for scanning (see examples below)
- Media: Multiple high-quality images from different angles, videos if available
- Pricing: Regular price and compare-at price for sales
- Inventory: Track quantities or mark as unlimited
- Variants: Size, color, material options with individual SKUs
Writing Descriptions That Sell
Most product descriptions list specifications. Customers want to know how the product improves their life. Compare these approaches:
Weak: “100% cotton t-shirt. Machine washable. Available in S-XL. Pre-shrunk fabric.”
Better: “Finally, a t-shirt that survives the dryer without shrinking into a crop top. Pre-shrunk 100% cotton stays true to size wash after wash. Soft enough for all-day wear, structured enough to look put-together on video calls.”
Lead with the problem you solve. Include specifications, but frame them as benefits. Break text into scannable chunks. Add size guides, care instructions, and answers to questions that might stop someone from buying.
Product Photography That Converts
Your photos sell your products. Shoppers can’t touch or try items online. Images carry that burden. You don’t need professional equipment. A smartphone with good lighting produces usable results.
Shoot near a large window with natural light. Turn off room lights to avoid mixing light temperatures. Use white foam board to bounce light into shadows. Clean white backgrounds eliminate distractions. Capture multiple angles: front, back, detail shots, scale references.
Aim for 2048×2048 pixel images for quality without excessive file sizes. Compress files before uploading. WebP format offers better compression than JPEG without visible quality loss. Add descriptive filenames and alt text for accessibility and SEO.
Organizing Collections
Collections group related products. Manual collections require you to add products individually. Automated collections pull products based on rules: tags, price ranges, vendor names. For stores with many products, automated collections save hours of ongoing maintenance.
Create collections that match how customers shop. “Women’s Shoes” works better than “Footwear Category A.” Think about the navigation paths visitors take. Collections become menu items and category pages.
Step 4: Set Up Payments
No payments, no sales. Configure this before launch through Settings then Payments.
Shopify Payments
The native payment processor, Shopify Payments, eliminates third-party transaction fees and requires minimal setup. Available in most major markets including the US, UK, Canada, Australia, and much of Europe. Credit card processing fees vary by plan:
- Basic: 2.9% + USD 0.30 per transaction
- Shopify (Grow): 2.6% + USD 0.30 per transaction
- Advanced: 2.4% + USD 0.30 per transaction
If Shopify Payments isn’t available in your country, connect alternative providers: PayPal, Stripe, or regional options. Third-party gateways incur additional fees: 2% on Basic, 1% on Grow, 0.6% on Advanced. These fees add up at volume, so factor them into pricing decisions.
Additional Payment Options
Consider enabling:
- PayPal: Some customers prefer it, adds checkout trust signals
- Apple Pay / Google Pay: One-tap mobile checkout increases conversion
- Buy Now Pay Later: Shop Pay Installments or third-party options like Klarna
Step 5: Configure Shipping
Shipping complexity kills conversions. Unclear costs, unexpected fees at checkout, missing delivery estimates. Get this right before launching. Navigate to Settings then Shipping and delivery.
Shipping Strategies
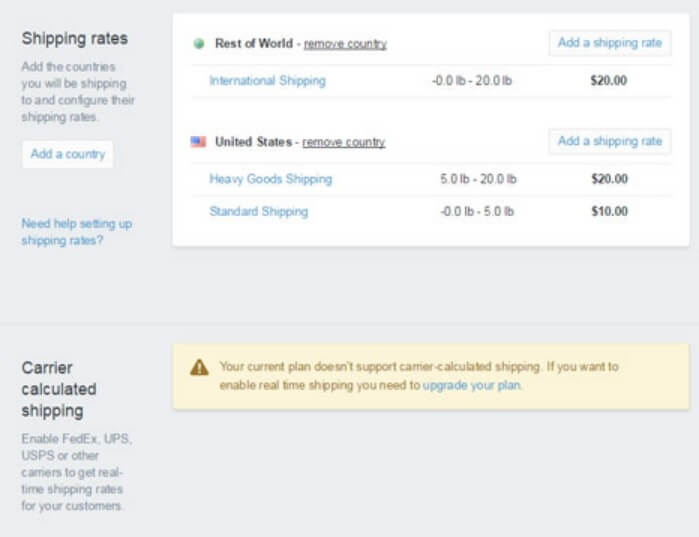
Flat rate shipping works for products with similar sizes and weights. Easy to understand, predictable for customers. Set rates by shipping zone: domestic, regional, international.
Calculated rates pull real-time prices from carriers like USPS, UPS, FedEx. More accurate but requires entering product dimensions and weights. Customers see exact shipping costs based on their location.
Free shipping with minimum order thresholds increases average order value. “Free shipping over USD 50” encourages customers to add items. Build shipping costs into product margins if offering free shipping across the board.
Shipping Profiles
Different products may need different shipping rules. Heavy items, fragile goods, digital downloads. Create shipping profiles for product categories that don’t fit your general rates. A 50-pound item shouldn’t ship for the same flat rate as a t-shirt.
Step 6: Legal Pages and Tax Setup
Skipping this section is tempting. Don’t. Missing legal pages erode customer trust. Incorrect tax settings create liability. Handle these before launch.
Required Legal Pages
Navigate to Settings then Policies. Shopify provides templates you can customize:
- Privacy Policy: Required by law in most jurisdictions. Explains what data you collect and how you use it. Shopify’s template covers basics, but customize if you use additional tracking or marketing tools.
- Terms of Service: Your rules for using the store. Covers payment terms, account responsibilities, dispute resolution.
- Refund Policy: Clear return windows, conditions, and process. Vague policies create customer service headaches. State whether you accept returns, timeframes, who pays return shipping, and how refunds are processed.
- Shipping Policy: Processing times, carrier options, international shipping availability. Set realistic expectations to reduce “where’s my order” inquiries.
Tax Configuration
Go to Settings then Taxes and duties. Shopify calculates taxes automatically for most regions, but you need to configure your collection settings. In the US, sales tax obligations depend on where you have “nexus” (physical presence, employees, or significant sales). This gets complicated fast.
For new stores: enable automatic tax calculation, register for sales tax in your home state, and consult a tax professional once you’re selling across state lines. Don’t ignore this. States pursue ecommerce tax compliance aggressively.
Business Registration
You can technically sell without formal business registration. Most serious sellers establish an LLC or similar structure for liability protection. This separates personal assets from business debts. Requirements vary by location. A local accountant or legal advisor can guide you through your specific situation.
Step 7: Set Up SEO and Tracking
Organic traffic from Google costs nothing per click. SEO investment compounds over time. Shopify handles technical fundamentals automatically: SSL, sitemaps, mobile optimization, clean URLs. Your job is content optimization.
Page Titles and Meta Descriptions
Every page needs a unique title under 60 characters and description under 160 characters. Include your primary keyword naturally. For product pages, include the product name and a compelling reason to click. Shopify’s AI can generate these, but review and refine for better results.
Product Page Optimization
Write detailed, unique descriptions for each product. Don’t copy manufacturer text that appears on dozens of other sites. Include keywords customers actually search for. Add size guides, care instructions, and answers to common questions. Rich content keeps visitors engaged and signals relevance to search engines.
Collection Page Strategy
Collection pages often rank better than individual products for category searches. Add 200 to 300 words of unique description to collection pages. Explain what the category includes, who it’s for, what makes your selection different.
Internal Linking
Link between related products, collections, and blog posts. Internal links distribute search authority and help visitors discover more of your store. “Customers who bought X often pair it with Y” sections serve both conversion and SEO purposes.
Structured Data
Most themes include basic product schema markup automatically. This helps Google display rich results with prices, availability, and ratings. Verify your markup works through Google’s Rich Results Test. If product data doesn’t appear correctly, your theme may need adjustments.
Conversion Tracking Setup
Before spending money on ads, set up tracking. Otherwise you’re flying blind.
- Google Analytics 4: Navigate to Online Store then Preferences. Paste your GA4 Measurement ID. Tracks visitor behavior, traffic sources, and conversion paths.
- Facebook/Meta Pixel: Required for Facebook and Instagram ads. Install through Settings then Customer events or use the Facebook channel app. Tracks actions like page views, add-to-cart, and purchases.
- Google Ads conversion tracking: If you’ll run Google Ads, set up conversion tracking through the Google channel app or by adding the global site tag manually.
Install these before launch, even if you’re not advertising yet. You’ll have baseline data when you’re ready to scale.
Step 8: Install Essential Apps
The App Store extends functionality beyond core features. The temptation is installing everything interesting. Resist it. Each app adds code that can slow your site. Aim for 8 to 12 apps maximum that genuinely drive revenue or save time.
Must-Have Categories
Email Marketing: Klaviyo or Shopify Email for abandoned cart recovery, welcome sequences, and promotional campaigns. Email drives repeat purchases more effectively than almost any other channel.
Reviews: Judge.me or Junip collect and display customer reviews. Social proof increases conversion. Reviews also create unique content that helps SEO.
Upsells: ReConvert or similar apps show cross-sells and upsells at checkout and thank-you pages. Increasing average order value costs less than acquiring new customers.
Analytics: Beyond Shopify’s built-in reports, connect Google Analytics 4 for deeper insights. Track where visitors come from, what they browse, where they drop off.
Apps to Consider Later
- Loyalty programs (Smile, BON) once you have repeat customers to reward
- Shipping automation (ShipStation) when order volume justifies the cost
- Helpdesk software (Gorgias) as support inquiries increase
Don’t install apps for problems you don’t have yet. Evaluate quarterly whether each app justifies its cost and performance impact.
Step 9: Test and Launch
Before removing password protection and going live, test everything a customer would experience.
Pre-Launch Checklist
- Place test orders using Shopify’s Bogus Gateway to verify checkout flow
- Test payment processing with a real small transaction you can refund
- Check all links in navigation, product pages, footer
- Verify email notifications work for order confirmations, shipping updates
- Review mobile experience end-to-end on actual phones, not just browser previews
- Confirm shipping rates display correctly for different addresses
- Test discount codes if you’ve created any
Going Live
Navigate to Online Store then Preferences. Uncheck “Restrict access to visitors with the password.” Click Save. Your store is now public.
Connect your custom domain if you haven’t already. A yourname.com address looks more professional than yourname.myshopify.com. Shopify walks you through DNS configuration step by step. Allow 24 to 48 hours for full propagation.
What To Do After Launch
Your store is live. Now what? The “build it and they will come” approach doesn’t work in ecommerce. You need to actively drive traffic.
Week 1: Foundation
- Tell everyone you know: Email your contacts, post on personal social media, ask friends to share. Your first customers often come from your network.
- Set up email capture: Add a popup or footer signup form. Offer a discount for first orders. Build your list from day one.
- Submit to Google Search Console: Request indexing for your main pages. Don’t wait for Google to discover you organically.
Week 2-4: Traffic Building
- Start with one traffic source: Don’t spread thin. If your customers are on Instagram, focus there. If they search Google, prioritize SEO content. Master one channel before adding others.
- Create content that answers questions: Blog posts, buying guides, comparison articles. This builds organic traffic over time and establishes credibility.
- Consider small paid ad tests: USD 5 to USD 10 per day on Facebook or Google to learn what resonates. Don’t scale until you know what works.
Ongoing: Optimize and Scale
- Watch your analytics weekly: Where do visitors drop off? What products get viewed but not purchased? These patterns reveal fixable problems.
- Email your customers: Abandoned cart emails recover lost sales. Post-purchase sequences encourage reviews and repeat orders.
- Test everything: Product photos, prices, descriptions, checkout flow. Small improvements compound into major revenue gains.
Common Mistakes That Kill Sales
After reviewing hundreds of struggling Shopify stores, certain patterns emerge. Avoid these:
Pricing Mistakes
- Hiding shipping costs until checkout: Surprise fees cause 48% of cart abandonment. Show shipping costs on product pages or offer free shipping with minimum orders.
- No comparison pricing: “USD 49” means nothing without context. “USD 49 (was USD 79)” shows value. Use compare-at pricing strategically.
- Underpricing: New sellers often race to the bottom. Factor in ads, returns, transaction fees, and your time. Margins below 30% rarely sustain a business.
Trust Mistakes
- No About page or contact information: Customers want to know who they’re buying from. A faceless store feels risky. Share your story. Display a real email address.
- Missing or vague refund policy: If customers don’t know they can return items, they won’t risk buying. Clear policies reduce friction.
- No reviews or social proof: New stores face a chicken-and-egg problem. Ask early customers for reviews. Use testimonials from beta testers. Show any social validation you have.
Technical Mistakes
- Slow loading pages: Every second of load time costs conversions. Compress images, limit apps, choose fast themes. Test your speed regularly.
- Broken mobile experience: Most traffic is mobile. If your checkout is awkward on phones, you’re losing sales. Test on actual devices, not just browser previews.
- Too many steps to checkout: Guest checkout should be the default. Don’t force account creation. Remove unnecessary form fields.
Shopify Pricing Breakdown
Understanding true costs prevents unpleasant surprises. Shopify’s pricing extends beyond monthly subscriptions.
Subscription Plans (February 2026)
Starter Plan: USD 5/month
Social selling only. No storefront. Suitable for selling through Instagram, TikTok, or link-in-bio pages. Missing SEO features, analytics, and design control. Not recommended for serious stores.
Basic Plan: USD 39/month
Full storefront, up to 10 inventory locations, basic reports, 24/7 support. Credit card fees at 2.9% + USD 0.30. Third-party gateway fees at 2%. Sufficient for most new stores.
Shopify (Grow) Plan: USD 105/month (or USD 79/month billed annually)
Professional reports, 5 staff accounts, Shopify Flow automation, lower transaction fees. Credit card fees drop to 2.6% + USD 0.30. Third-party fees at 1%. The annual discount makes this plan attractive for growing stores.
Advanced Plan: USD 399/month
Custom reports, 15 staff accounts, calculated shipping rates from carriers, lowest transaction fees. Credit card fees at 2.4% + USD 0.30. Third-party fees at 0.6%. Makes sense at high volume where fee savings offset subscription cost.
Plus Plan: Starting at USD 2,300/month
Enterprise tier with custom pricing, dedicated support, advanced automation. Requires three-year commitment. Only for established businesses with complex needs and significant revenue.
Hidden Costs to Budget For
- Domain registration: USD 15 to USD 20 annually (first year free on most plans)
- Premium theme: USD 200 to USD 400 one-time
- Apps: Most useful apps cost USD 10 to USD 100 monthly
- Transaction fees: 2% to 0.6% on non-Shopify Payments depending on plan
Which Plan Should You Choose?
Start with Basic. Upgrade when you need features available on higher plans or when transaction fee savings exceed the subscription difference. A store processing USD 50,000 monthly saves enough on fees upgrading to Grow to cover the higher subscription. Do the math for your projected volume.
Shopify Limitations to Know
The platform works brilliantly within its design. Understanding the boundaries prevents frustration when you hit them.
Limited URL Control
You can’t change URL structure. Products always live at /products/, collections at /collections/. This matters less than SEO purists suggest, but it’s still a constraint other platforms don’t impose.
Theme Code Restrictions
Customizing beyond the visual editor requires Liquid (Shopify’s template language). The learning curve is gentler than PHP, but it’s still code. Complex custom functionality often requires hiring a Shopify developer.
App Dependency
Features that come standard on other platforms (like advanced wishlist functionality or complex product filters) require paid apps on Shopify. App costs add up. An app-heavy store might spend more on apps than on Shopify itself.
Checkout Customization
Standard plans use Shopify’s checkout with minimal modification options. Full checkout customization requires Shopify Plus at enterprise pricing. This frustrates brands wanting unique checkout experiences.
No Site Export
Leaving Shopify means rebuilding. You can export product data, but there’s no easy migration path for themes, pages, or apps. Vendor lock-in is real. Factor this into long-term platform decisions.
Frequently Asked Questions
How long does it take to set up a Shopify store?
A functional store with a few products can launch in a single afternoon. A polished store with full product photography, optimized descriptions, configured shipping, and proper SEO takes most people 1 to 2 weeks of part-time work. Speed depends on having your content ready before starting. Write descriptions, prepare images, and plan your structure before opening Shopify.
Is Shopify good for beginners?
The primary advantage is accessibility for non-technical users. The admin interface uses clear language rather than jargon. Themes work without code. Sidekick AI answers questions in plain English. Beginners can launch stores that look professional. The platform deliberately trades advanced flexibility for ease of use.
Can I sell digital products on Shopify?
Yes, with caveats. You need the Digital Downloads app (free from Shopify) or a third-party app for more features. Digital products work differently from physical goods: no shipping, instant delivery, different refund considerations. Shopify handles this but requires some configuration beyond the default physical product setup.
How much does Shopify actually cost per month?
Beyond subscription fees, budget for transaction fees (1% to 2% if not using Shopify Payments), apps (USD 50 to USD 200 monthly for a typical store), and your domain (USD 15 yearly). A realistic monthly budget for a new store on Basic: USD 60 to USD 150 all-in. Volume sellers processing significant revenue face higher transaction fees but can offset with higher-tier plan savings.
Is Shopify better than WooCommerce?
Different tools for different situations. Shopify offers simplicity, reliability, and all-in-one pricing. WooCommerce on VPS hosting offers more control, lower ongoing costs at scale, and unlimited customization. Shopify suits merchants who want to focus on selling. WooCommerce suits those comfortable with technical management or those needing capabilities Shopify doesn’t offer.
Final Verdict
Here’s what you gain: no server management, no security patches, no PCI compliance headaches, no scaling concerns. All invisible. You focus on products, customers, and marketing. For most first-time store owners, that trade-off makes sense.
The platform suits straightforward product selling well. Physical goods, simple variants, standard checkout flows. As requirements get complex, as you need custom functionality, as transaction fees eat into margins at high volume, the limitations start mattering more.
Choose Shopify if you want to sell online without technical complexity, you’re launching your first store, or you prioritize time-to-market over maximum customization.
Look elsewhere if you need extensive custom functionality, you’re processing high enough volume that transaction fees significantly impact margins, or you require the flexibility that self-hosted solutions provide.
Start with the Basic plan and the free trial. Build your store, test with real customers, and upgrade when the business justifies it. Most successful Shopify stores started exactly that way.
For those who decide they need more control, our WordPress ecommerce hosting guide covers WooCommerce options, and our cloud hosting comparison explains scaling options for growing stores that outgrow managed platforms.