On This Page: [hide]
Are you in need to migrate from Wix to WordPress? Unlock a world of possibilities for your website – act now! Follow this guide to learn how you can do it in a few minutes time.
Wix is a very popular site builder, used by more than 165 million users. It is simple, fast, and allows you to create websites without much technical knowledge.
However, most of Wix’s users soon begin to realize, that the Wix’s options are limited and if they want to add some new features to their site, it starts to become pretty expensive. In this article, we are going to show how to migrate from Wix to WordPress.
How to Migrate Wix to WordPress (Steps)
If you want to have a fully functional and feature-rich website, without adding extra cost for every new feature, then to migrate from Wix to WordPress would be the right choice.
WordPress powers more than 30% of all websites available on the world wide web and it is extremely fast, reliable, secure, and also pretty easy to use. There are various ways to make th, but we believe that the easiest is by RSS import.
The average migration time is between 10~60 minutes, depending on the number of pages of your website.
The steps to migrate a Wix Website to a WordPress are:
- Choosing a good Wix to WordPress hosting plan
- Importing your blog posts with an RSS feed.
- Converting your pages to WordPress pages
- Creating navigation
- Creating redirects
Of course, before you migrate from Wix to WordPress website, you should have a WordPress website installed and active. To learn how to do that, check out Starting a WordPress Blog Guide.
How to Migrate Wix Posts to WordPress
Moving blog posts from Wix to WordPress can be tricky as Wix doesn’t offer simple export options. However, an automatic transfer is possible by importing the Wix RSS feed, saving you from manually creating each post on WordPress.
To do that, you should first download your RSS file from Wix. In the URL address of your website, add “/feed.xml or /blog-feed.xml” to the end of it.
It should look like YourDomain.Com/feed.xml or YourDomain.com/blog-feed.xml.
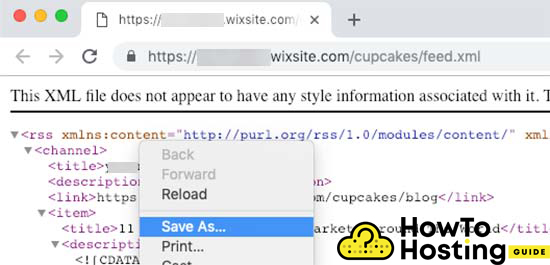
You should see something very similar to the image above.
Right-click anywhere on the page and then click “Save As” to save it to your device.
Now after you’ve successfully downloaded your feed, you should go to your WordPress dashboard and click on the Tools menu and then select Import.
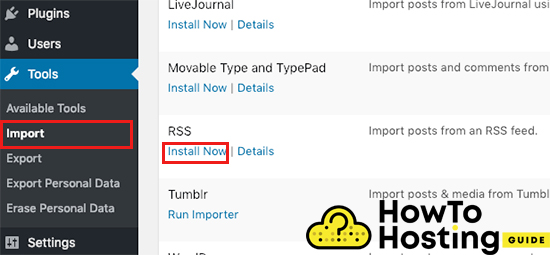
In a few seconds, you should see a link at the top of your page, that allows you to “Run Importer“.
Click on that link and then click on the “Choose File” button that will appear. Select the feed.xml file, that you downloaded to your computer and then click upload and Import.
This might take several minutes depending on the size and the number of your posts, but let it finish until you see a confirmation message.
After you see the success message, navigate to your Posts and click All Posts and you should now see all of the posts that you imported.
How To Fix WordPress Images After RSS Import
Now, once you’ve done that step, you might find something confusing – that there will be no images uploaded in your posts, and that is because your images are still hosted on the Wix platform.
However, there is a very easy and handy way that you can use to transfer your images over your WordPress website. To do that, you need to install and activate a plugin called “Auto Upload Images”.
After you download, install, and activate the plugin you will have to re-save all of the posts and the plugin will import all of their images automatically. In case that there are hundreds or even thousands of posts, and re-saving them one by one will be a time-consuming job, WordPress allows you to re-save all of its posts at once.
To do that, go to Posts, then click All Posts, and on the top of the page, you will see a “Screen Options” button.
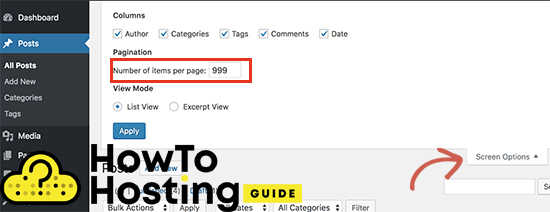
Click on the “Numbers of items per page” and change the number to 999. This will make WordPress reload all of its posts allowing you to edit all of them together.
How to Select And Update All Posts
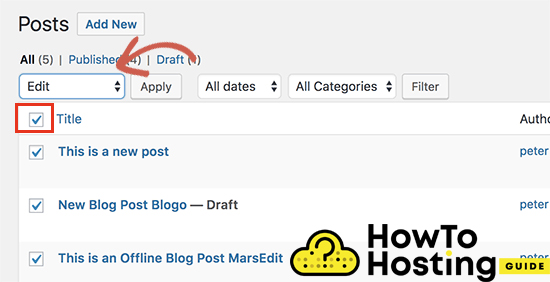
Click on the top checkbox before “Title” to select all of the posts, and then select the Edit link that is located under the bulk actions menu.
Then click on the Apply button and when all of the posts are selected, click on the Apply button and WordPress will update all of your posts.
How to Import Wix Pages To WordPress
After you’ve successfully imported your posts from Wix to WordPress, you will have to transfer your Wix pages as well.
Wix does not provide an automated way for page transfer, so you will have to create them one by one. Hopefully, most of your content will be in your posts, so creating the new pages won’t take much time and effort.
To do that, go to your Dashboard, click on Pages and then Add New.
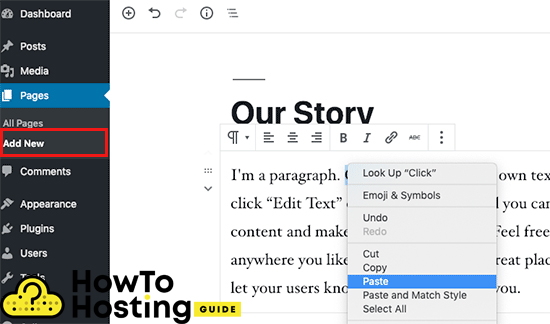
Create the title of your page, copy and paste the content from your Wix page, add some images if it is needed, and click on the Publish button.
Do that for all of your pages and you can proceed with creating your menu.
Creating a WordPress Menu
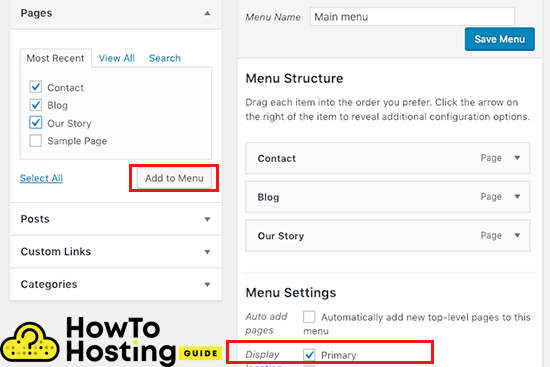
Creating the Menu in WordPress is easy, just go to Dashboard – Menus and add the pages that you want, then set it to Primary, and then click on the Save Menu button on the top of the page.
Redirect Wix to WordPress
After your new WordPress website is completed, and you’ve imported and created your pages, posts, and menus, you have to let your visitors know about your move if you want to migrate from Wix to WordPress.
It is important to create proper redirections not only because of the people that visit your website but because of the search engines and SEO as well.
Have in mind, that you can only redirect users to your New WordPress website only if you have a custom domain on Wix. If you are using a subdomain on Wix, then you will not be able to do it.
First, you need to open any text editor such as Notepad++ and paste this code inside:
var hashesarr = {
“#!about-us/c2it2”:’/about/’,
“#!contact/ce54”:’/contact/’,
“#!random-article/c1mz”:’/random-article/’
};
for (var hash in hashesarr) {
var patt = new RegExp(hash);
if (window.location.hash.match(patt) !== null) {
window.location.href = hashesarr[hash];
}
}
For example, we’ve used three URL’s in the following format “#!about-us/c2it2:’/about/’;
The first line is the URL that your Wix users will be coming from, and the second part is the slug of your WordPress page.
You have to manually do that for all of your pages, and save this file as redirects.js.
Once you do that, you need to upload that file straight in your WordPress theme/js/directory. That can be done with any FTP client, such as FileZilla for example.
In case that your theme does not have a /js/ directory, you have to create it.
Again, with your FTP client, you should download your functions.php file and open it with any text editor.
Go to the bottom of it and paste the following code:
function wpb_wixjs () {
wp_enqueue_script( ‘wixredirect’, get_stylesheet_directory_uri() . ‘/js/redirects.js’, array(), ‘1.0.0’, true);
}add_action(‘wp_enqueue_scripts’, ‘wpb_wixjs’);
Save the changes and re-upload that file to your website and overwrite the old functions.php file.
Then, your Wix website will be fully migrated to WordPress.
Migrate from Wix to WordPress – Conclusion
In conclusion, migrate from Wix to WordPress can be a bit of a hassle since Wix doesn’t make it easy to export your content. But, by using the Wix RSS feed, you can automate the process instead of manually creating each post on WordPress.
This way, you save time and effort, making the move to WordPress smoother. If needed, look for extra tools or get professional help to make sure everything transfers over nicely.
