On This Page: [hide]
Through this article, you’ll dive deep into the essence of WordPress Multisite, from its structure and benefits to overcoming common challenges and maximizing its potential, providing a kind of map for navigating the sometimes complex but rewarding world of managing a network of websites.
WordPress Multisite: What Is It Exactly?
WordPress Multisite is a feature that allows you to run a network of websites from a single WordPress installation. Imagine having the ability to manage multiple sites- each with its own theme, set of plugins, and content – without having to log in and out of different admin panels. This functionality not only streamlines the process of site management but also introduces unprecedented scalability for webmasters, developers, and businesses alike. Through WordPress Multisite, what once required multiple hosting accounts and separate WordPress installs can now be accomplished neatly within one dashboard.
Structure of WordPress Multisite
The structure of WordPress Multisite is a fascinating blend of simplicity and sophistication. When you enable Multisite on your WordPress installation, it cleverly modifies the WordPress database to support the addition of new sites. This does not multiply the needs for separate databases; instead, it creates new tables for each site within the same WordPress database. This ingenious setup ensures each site operates independently on the frontend while sharing a unified core on the backend.
Administratively, this setup introduces the role of the Super Admin – a user with the permissions to manage the network-wide settings, plugins, and themes. Individual site admins can then manage their own sites within the network but with a limited set of capabilities as defined by the Super Admin. This hierarchical structure ensures a smooth operation of each standalone site while maintaining overarching control under a single administrator.
The Evolution of WordPress Multisite Over the Years
The journey of WordPress Multisite has been marked by significant evolution and adaptation. Initially introduced as WordPress MU (Multi-User), its primary function was to allow multiple blogs to exist within one installation, a feature that educators and larger institutions quickly embraced. However, as WordPress evolved, so did the vision for Multisite. With the release of WordPress 3.0, Multisite became a standard feature, enabling users to create a network of sites with ease.
Over the years, improvements have continued to refine and enhance the Multisite experience. These enhancements have included more granular control over network settings, improved user management, and more straightforward site creation. Moreover, the development community has embraced Multisite, contributing plugins and themes designed specifically to maximize its capabilities. This ongoing development and focus on ease of use have secured WordPress Multisite’s place as a powerful solution for managing large-scale web presences efficiently.
Why Consider WordPress Multisite?
When crafting a digital empire that stretches across multiple websites, finding efficient solutions for management and operation is crucial. WordPress Multisite helps administrators seeking streamlined processes, cost reduction, and uniformity across their online presence. This platform allows you to wield control over a network of sites, optimizing operations from a singular point of command, thereby simplifying complex tasks into manageable actions.
Streamlining Management of Multiple Sites
Imagine overseeing a fleet of websites, each requiring individual attention for updates, user management, and content curation. WordPress Multisite transforms this labor-intensive process into a smooth, centralized operation.
By enabling you to update core software, themes, and plugins across all sites with a single click, it significantly reduces the time and effort required for maintenance. This centralized approach not only streamlines administration but also ensures that all sites within your network are uniformly secure and up to date. Moreover, the capability to share themes and plugins across the network simplifies the deployment of new sites, allowing you to expand your digital empire swiftly without compromising on consistency or quality.
Cutting Costs and Improving Efficiency
Cost-efficiency is paramount in the expansion and maintenance of a digital empire. WordPress Multisite addresses this by consolidating hosting and licensing expenses. Instead of incurring separate costs for each site within your network, Multisite allows you to operate under a single hosting account. This significantly cuts down on overheads, particularly if you’re managing a considerable number of sites.
Key Benefits and Limitations of WordPress Multisite
WordPress Multisite offers a versatile platform for businesses and content creators managing multiple websites. However, it’s essential to weigh both its advantages and potential limitations to ensure it fits your project’s needs.
Scalability and Ease of Use
One of the most significant advantages of WordPress Multisite is its scalability. This feature allows users to effortlessly add or manage numerous websites from a single WordPress installation. This scalability ensures that as your business grows, your web infrastructure can grow with it without the need for additional installations. This convenience extends to ease of use, where updates, security, and plug-in management can be handled centrally, saving time and resources.
- Centralized Management: Perform sitewide updates and manage plugins and themes from a single dashboard.
- Cost Savings: Eliminates the need for separate hosting accounts, reducing overhead costs.
- Uniformity: Ensures brand and design consistency across all websites, enhancing the user experience.
While scalability and central control are major assets, the platform’s ease of use might vary depending on the user’s technical expertise. Initial setup and configuration require a foundational understanding of WordPress and network management. However, once established, the multisite network is relatively straightforward to operate, even for users with minimal technical background.
Potential Challenges and How to Overcome Them
Despite its benefits, WordPress Multisite comes with challenges that prospective users should consider. Here’s a breakdown of common issues and strategies to mitigate them:
- Complex Setup: Initially, configuring a multisite network can be complex. Overcome this by thoroughly planning your network structure and seeking guidance from WordPress multisite tutorials or professional web developers familiar with the multisite setup.
- Plugin Compatibility: Not all plugins are compatible with multisite environments. Prioritize using plugins designed for multisite use and test new plugins on a staging site before deploying them network-wide.
- Site Isolation: By default, sites within a multisite network are not entirely isolated. This could pose a security risk if one site is compromised.
- Resource Distribution: All sites share the same server resources, which can lead to performance issues if not monitored. Implement caching, optimize images and content, and consider a hosting plan that scales with your needs to ensure smooth performance across the network.
Addressing these challenges head-on ensures that your WordPress Multisite network remains efficient, secure, and scalable. Regular maintenance, security checks, and updates are critical in overcoming potential limitations and leveraging the full benefits of WordPress multisite.
Is WordPress Multisite the Right Choice for Your Project?
Choosing whether to implement a WordPress Multisite network often hinges on comparing its benefits against its limitations, specifically in relation to your project’s requirements. This platform can offer a streamlined, efficient way to manage multiple sites through a single dashboard, but it’s not without its challenges. Understanding when it shines and when it might fall short is key to making an informed decision that aligns with your web management goals.
Typical Scenarios Where Multisite Shines
WordPress Multisite is particularly beneficial in scenarios that involve managing a collection of websites requiring a unified control panel for updates, plugins, and themes. Let’s consider a few situations where Multisite excels:
- Multi-branch Organizations: Businesses with several locations can create a unique site for each branch while maintaining a cohesive brand identity across all platforms.
- Educational Institutions: Schools and universities can leverage Multisite to host separate sites for different departments, programs, or research projects.
- Content Networks: Publishers managing various content verticals such as news, sports, and entertainment can efficiently run and update numerous sites.
- Community Portals: For organizations like nonprofits or associations, Multisite allows for creating distinct but interconnected community, forum, and event sites.
These scenarios outline how Multisite’s structure is ideal for projects that benefit from shared administrative responsibilities, plugin, and theme resources, alongside the need for individual site customization.
When to Think Twice Before Using Multisite
Though WordPress Multisite offers considerable efficiencies, it’s not a perfect fit for every project. Consider other options if your scenario aligns more closely with the following:
- Single Site Focus: If your plan involves running a single website, the additional complexity of Multisite setup and management isn’t beneficial.
- Unique Site Needs: Projects requiring highly specialized plugins, themes, or hosting configurations for each site may find Multisite limiting.
- Database Separation: When strict data isolation between sites is needed, whether for security, privacy, or organizational reasons, sticking to individual WordPress installations is advisable.
- IP Address Requirements: If each site demands a unique IP address, for SEO or security reasons, navigating the Multisite network’s shared infrastructure can present challenges.
Comprehensive Guide to Setting Up WordPress Multisite in 2025
Initial Considerations: Hosting, Domain, and SSL Setup
Before diving into the technical aspects of setting up a WordPress Multisite, it’s crucial to lay the groundwork properly. A robust hosting solution is the first step. WordPress Multisite demands more from your hosting due to its complexity and the potential volume of traffic across network sites. Opting for a host that offers dedicated support for WordPress Multisite can simplify technical hurdles and provide the necessary resources for smooth operation.
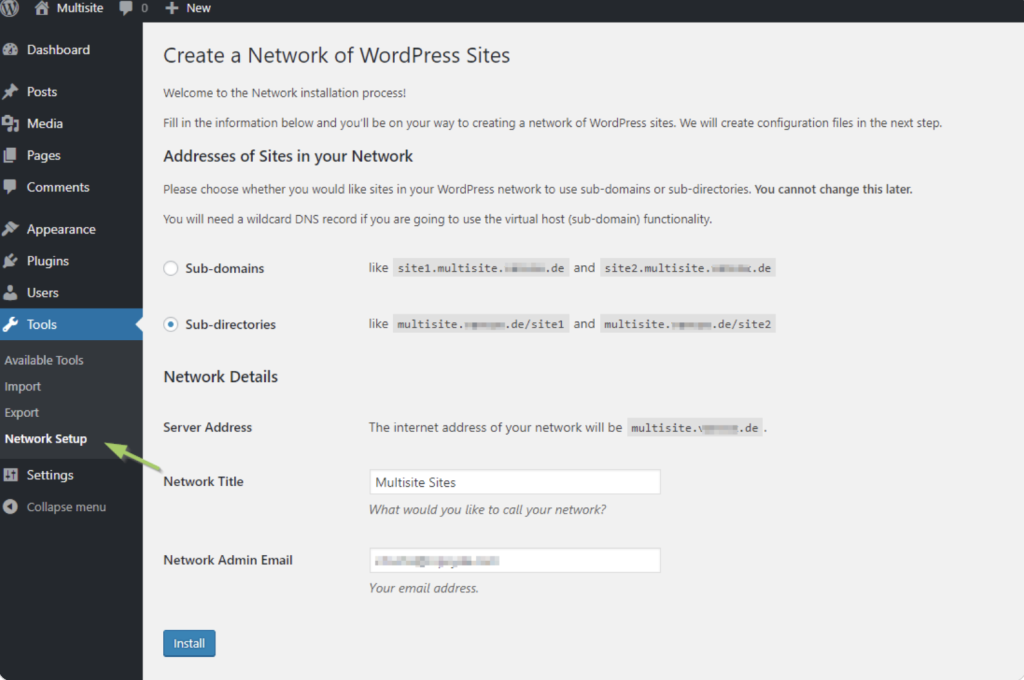
In addition to hosting, choosing between subdomains and subdirectories will affect your site’s structure and SEO. Subdomains (site1.yourdomain.com) are treated as separate entities by search engines, while subdirectories (yourdomain.com/site1) are seen as part of the same site, which might influence your SEO strategy. Whatever your choice, ensuring your domain is properly registered and your hosting is configured to support it is key.
Lastly, securing your network with SSL is non-negotiable. SSL encryption not only protects data transfer on your sites but also boosts your SEO and trustworthiness in the eyes of your visitors. Most hosts offer easy SSL certificate installation, so make sure your entire network is covered.
Configuring Network Settings: A Step-by-Step Walkthrough
Enabling Multisite on a Fresh WordPress Installation
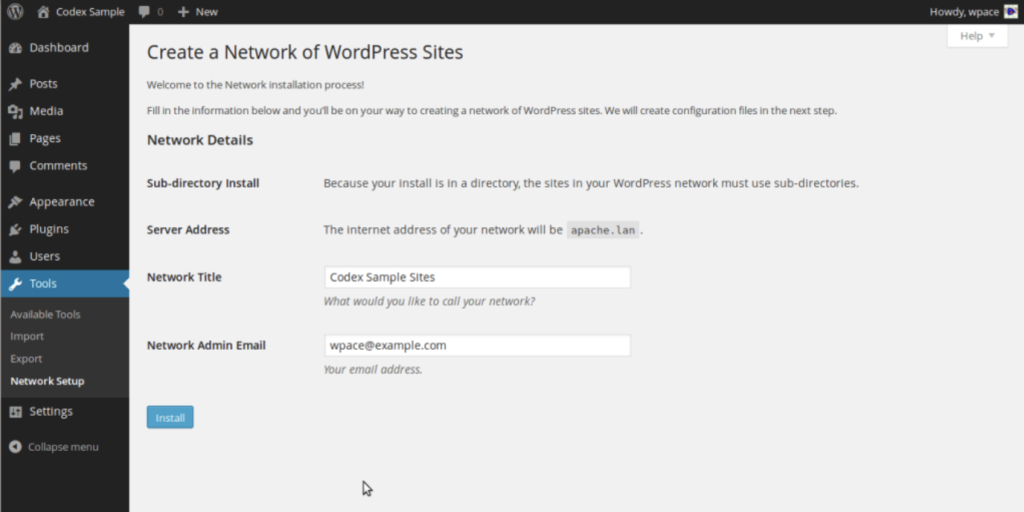
If you’re starting with a fresh WordPress installation, enabling Multisite is straightforward. After ensuring your WordPress is the latest version, edit the wp-config.php file by adding define('WP_ALLOW_MULTISITE', true); just above the line that says /* That’s all, stop editing! Happy blogging. */. This code snippet activates the Multisite feature, opening up new setup options in your WordPress dashboard under Tools > Network Setup.
Migrating an Existing Site to a Multisite Network
Migrating an existing WordPress site to a Multisite network requires careful planning. The process will demand that you disable all plugins and ensure your WordPress installation is clean and updated. Once you’ve performed a full backup, follow the steps to enable Multisite as you would with a fresh installation. It’s crucial to test your network extensively on a staging site before going live to prevent any disruption to your current site’s functionality or user experience.
DNS Configuration for Subdomains vs Subdirectories
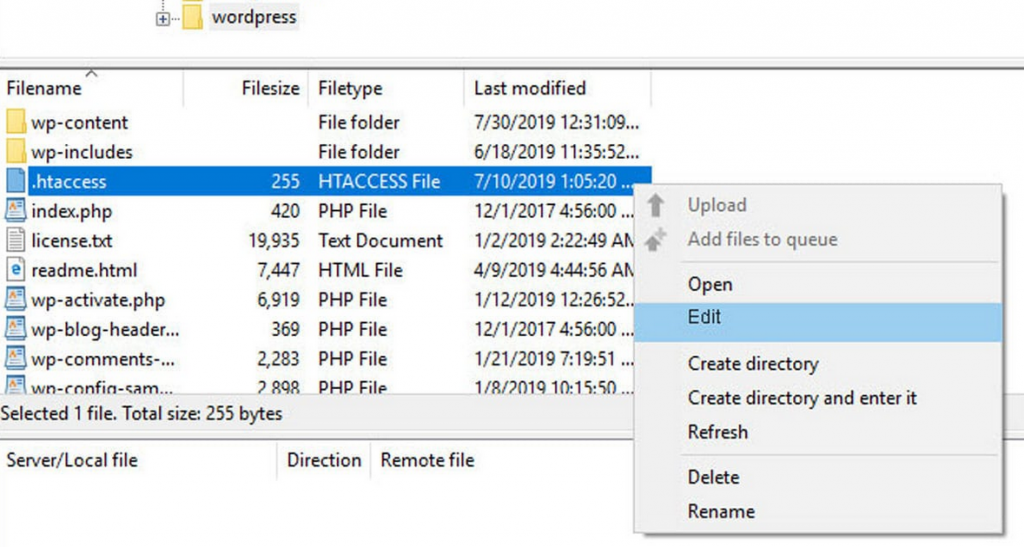
Configuring your DNS is a critical step that varies depending on whether you choose subdomains or subdirectories. For subdomains, you’ll need to set up wildcard DNS records, which allows you to create new sites without individual DNS configuration for each. This setup is typically managed within your hosting control panel or directly with your domain registrar. On the other hand, subdirectories require less DNS configuration, making them a simpler option for those less comfortable with technical adjustments. However, ensure your WordPress .htaccess file is correctly configured to handle the URL structure of your choice.
Remember, while setting up a WordPress Multisite might seem complex, careful planning and preparation can simplify the process. Choosing the right hosting environment, deciding between subdomains or subdirectories, setting up SSL, and correctly configuring your network settings lay a solid foundation for your multisite network. With these steps, you’re well on your way to efficiently managing multiple WordPress sites from a single dashboard.
How to Optimize Your WordPress Multisite Network
Optimizing your WordPress multisite network is crucial for ensuring smooth and efficient operation across all your sites. By paying close attention to user roles, theme and plugin management, and best practices for file and database upkeep, you can enhance performance, improve security, and provide a better experience for users and site administrators alike.
Mastering User Roles and Permissions Across Your Network
User roles and permissions form the backbone of site security and administration in a WordPress multisite network. Understanding and correctly implementing these roles is key to managing access and capabilities effectively. The super admin role, exclusive to multisite networks, holds the power to manage network-wide settings, themes, plugins, and even create new sites. Site-specific roles like administrator, editor, and author, meanwhile, have permissions limited to their respective sites.
To optimize your network, regularly review and adjust these roles as needed to reflect the current needs of each site and user. For example, limiting the number of users with super admin rights minimizes security risks, while ensuring site administrators have the necessary permissions enables them to manage their sites effectively without constant oversight.
Best Practices for File and Database Management
Efficient file and database management is critical for keeping your WordPress multisite network running smoothly. Regularly back up your network to safeguard against data loss and ensure you can quickly recover in case of a site failure or security breach. Schedule these backups during off-peak hours to minimize disruptions.
To keep your database lean and performant, regularly purge unnecessary data, such as spam comments, outdated post revisions, and transient options. Additionally, using a staging environment for testing themes, plugins, and core updates before applying them to your live sites can help catch and resolve issues before they affect your users.
By following these best practices for user roles, themes and plugins, and file and database management, you can optimize your WordPress multisite network for better performance, security, and user experience.
Security Measures for WordPress Multisite Networks
For those managing WordPress multisite networks, ensuring the security and integrity of your sites is paramount. Given the interconnected nature of multisite networks, a vulnerability in one site can potentially affect others within the same network. Therefore, incorporating strong security measures is not just beneficial—it’s essential.
Regular Updates and Backups
Two fundamental practices stand as the pillars of WordPress multisite network security – regular updates and robust backup strategies. Updating WordPress core, themes, and plugins across your network shields your sites from known vulnerabilities. Equally critical, regular backups serve as a fail-safe, ensuring that, should the worst occur, you can restore your sites to their pre-issue state without significant loss.
- Update regularly: Schedule updates for times of low traffic to minimize potential disruptions.
- Implement backup solutions: Utilize both onsite and offsite backups for comprehensive coverage.
Specific Security Concerns with Multisite and How to Address Them
Multisite networks face unique security challenges, including the risk of cross-site contamination and the complexity of managing access controls. Specific strategies can help mitigate these risks:
- Create strong user access policies: Limit super admin roles to users who truly need them and regularly review user access levels.
- Use security plugins: Deploy plugins designed to address common WordPress security issues, enhancing your network’s defense.
- Segregate sites where possible: Isolate sites within your network to prevent potential threats from spreading.
Leveraging Multisite for a Unified Content Strategy
Adopting a unified content strategy across a WordPress Multisite network simplifies content management and ensures a cohesive experience for your audience. By sharing themes and plugins, you can maintain brand consistency with ease. Here’s how to do it effectively:
- Content Syndication: Share standout content across your network sites. This approach helps in spotlighting key messages or campaigns consistently.
- Centralized Media Library: Utilize plugins to centralize media storage. This makes assets readily available network-wide, ensuring uniform visual branding.
- Consistent Branding: Apply a uniform theme or customize individual site themes with shared brand elements like logos, fonts, and color schemes to reinforce brand identity.
- Role-Based Content Creation: Define roles and permissions carefully to streamline content creation. Designate team members to create, approve, and publish content network-wide for efficient workflow.
This strategy emphasizes the need for a cohesive approach to content across all sites within the network, enhancing user experience and brand recognition.
Customizing the Admin Dashboard for Network Efficiency
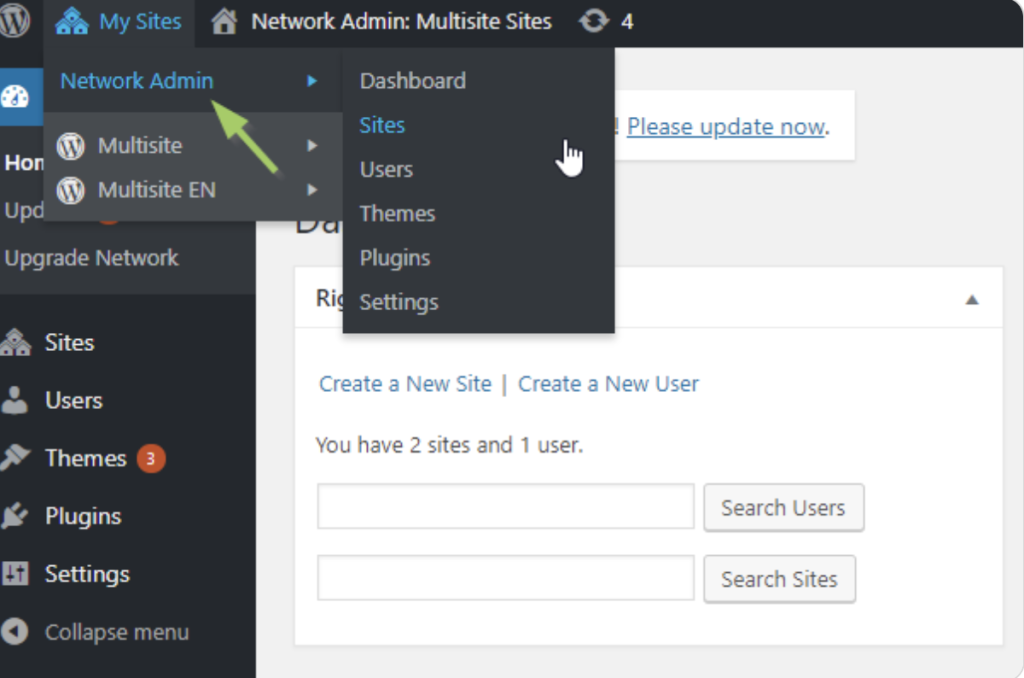
Customizing the WordPress Multisite admin dashboard enhances network management efficiency, allowing super admins to swiftly navigate settings, sites, and user controls. Implementing the following customizations can significantly improve your workflow:
- Simplify Dashboard: Remove unnecessary dashboard widgets to reduce clutter and focus on essential information and functionalities.
- Admin Bar Customization: Modify the admin bar to include quick links to frequently used areas such as site creation, user management, and network settings for rapid access.
- Managing Notifications: Centralize update notifications for themes, plugins, and WordPress core to the network admin dashboard for a clear view of what needs attention.
- Custom Roles and Capabilities: Create custom roles specific to your network’s needs, enabling precise control over who can do what across the entirety of your multisite installation.
With these customizations, super admins can navigate the network admin dashboard with greater efficacy, making management tasks less time-consuming and more streamlined.
These advanced tips and tricks not only simplify management tasks but also optimize the use of WordPress Multisite for those overseeing multiple sites. By focusing on a unified content strategy and dashboard customization, super admins can enhance network performance and user experience alike.
Solving Common WordPress Multisite Challenges
WordPress Multisite networks offer a streamlined approach to managing multiple websites, yet they present unique challenges that demand efficient solutions. Let’s dive into solving some of the most common issues, particularly focusing on plugin conflicts and media storage across numerous sites.
Debugging Network-Wide Plugin Conflicts
Plugin conflicts are a common issue in WordPress Multisite networks, often causing functionality problems or site crashes. Addressing these effectively requires a systematic approach:
- Deactivate all plugins network-wide: Begin by turning off all plugins. This can quickly determine if the issue at hand is indeed caused by a plugin.
- Re-activate plugins one by one: Slowly activate each plugin, testing the sites’ functionality after each activation. This step helps identify the exact plugin causing the conflict.
- Check plugin compatibility: Ensure that the plugins are compatible with WordPress Multisite. Some plugins are designed for single-site installations and might not function properly on a multisite network.
- Seek alternative solutions: If a plugin is essential for your network but causes issues, look for an alternative that offers similar functionality but with confirmed multisite compatibility.
- Contact plugin developers: If a specific plugin is crucial for your operations, reaching out to the plugin developers can be a productive step. They may offer a solution or an update to resolve the conflict.
Efficiently Managing Media Storage Across Sites
As WordPress Multisite networks grow, so do their media libraries. Efficient management of media files across multiple sites is crucial to maintaining swift site performance and adequate storage levels. Here are some strategies:
- Centralized media library: Implementing a shared media library can help avoid duplicate uploads, saving storage space. This allows sites within the network to access a common pool of media files.
- Cloud storage solutions: Integrating cloud storage services such as Amazon S3 or Google Cloud Storage can offload your media files from your server, enhancing site speed and providing scalable storage options.
- Media cleanup plugins: Utilizing plugins designed for media cleanup can help remove unused or redundant media files across your network, freeing up valuable storage space.
- Compression tools: Employing image compression tools can significantly reduce file sizes without compromising quality, ensuring efficient use of storage and faster loading times for your sites.
Strategically managing media storage not only optimizes your network’s performance but also creates a more cohesive and efficient digital environment. By leveraging the right tools and approaches, you can overcome the challenges of media management in a WordPress Multisite network, ensuring smooth operation and an enhanced user experience.
Conclusion
WordPress Multisite is indeed a beacon for those navigating the management of multiple websites or blogs under one umbrella. By centralizing the administration and enabling shared resources, it stands out as a highly efficient tool for bloggers, educators, and enterprise-level managers alike. The main advantage of WordPress multisite lies in its ability to control operations, offering a unified approach to updates, plugins, and themes across all sites. This not only saves significant time but also ensures consistency and reliability throughout your digital presence.
However, the utility of WordPress Multisite doesn’t come without its challenges. The initial setup demands a thoughtful approach, considering factors like hosting capabilities, domain configurations, and the structuring of your network. Despite these considerations, the investment in understanding and setting up a multisite network yields considerable dividends.
Regular maintenance and an insightful understanding of each site’s needs within your network are paramount to leveraging the full potential of this powerful feature. In essence, the success of a WordPress multisite implementation is anchored in careful planning, ongoing upkeep, and a keen awareness of your network’s requirements.
For those who may find the setup process complex or are keen on making the most out of this feature, the path to mastery involves continuous learning and possible collaboration with WordPress development professionals. This could mean engaging with WordPress development companies or independent experts who specialize in multisite configurations.
Their expertise can guide you through the initial stages of setup, or provide valuable insights into optimizing your network for peak performance. Remember, with the right setup and management, the complexities of running multiple websites can transform into a streamlined, highly efficient process, empowering you to scale your online presence effectively.
