
On This Page: [hide]
If you have ever used Magento CMS, you probably know that it is not the most comfortable platform for beginners. If you are struggling with installing, changing, or creating a custom theme, we from Howtohosting.guide have prepared a technical guide and tips on installing themes in Magento 2.

How to install themes in this CMS?
The Magento 2 themes are e-commerce focused and provide different features and layouts with the opportunity to customize them. But the most vital thing that makes the visitors engage with your website is the beautiful design. Installing them can be done in two different methods.
Manual Installation
When you download a theme, you have a list of files in a zipped folder.
– Unzip the theme files
Open the archive files and unzip them then spot the two directories: app and pub.
– Upload the theme files
Go to Magento 2 store and navigate to the root directory, and then upload the unzipped folders in the directory.
The next thing you need to is run the following commands.
First, you need to connect the store via SSH then navigate to the root directory and upgrade the setup with these commands:
php bin/magento setup:upgrade
php bin/magento setup:static-content:deploy
That’s all you need to do in the manual installation. Now you have your theme installed. To finish you need to login into the admin panel.
– Login to admin panel
Go to Content –> Design –> Configuration and then edit.

Then select the wanted theme from the dropdown menu and save the configuration.
Install Theme via Composer
The first thing you need is to purchase it from the store. After that go to the root directory and enter the following command:
composer require
Wait until the dependencies are updated and run the next command;
git add -A && git commit -m “Add theme” git push origin
You need to verify that the theme is registered. To do this you need to wait until it is installed and then log in to Admin Panel and reload any of the backend pages.
Go to Content –> Design –> Themes and check if the theme is on the right panel in the list of available themes.
Completing the last step you are ready with theme installation.
How to Change Themes?
After you have installed your theme if you don’t like it any more there is an opportunity to change it.
This process is not a hard task to do, just follow the development instructions.
First, you need to log in to the Admin Panel go to Content –> Design –> Configuration then click on the “edit” button.
You will see your current theme dropdown. For the other themes you have purchased and installed, choose the one you want.
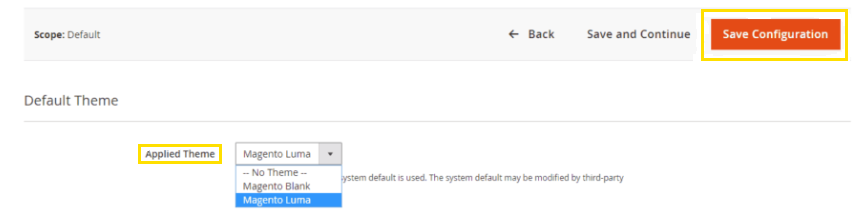
Then Save the Configuration
That is all you need to do.
How to Create a Custom Theme?
Creating a custom design is not that easy as installing, and changing it and it’d be better to be done by a developer.
Create Relevant Structure
The first thing you need to do is to create Theme structure and Folder structure.
Your app/design/frontend/mageplaza/theme.xml file should look similar to this:
<theme xmlns:xsi=”http://www.w3.org/2001/XMLSchema-instance” xsi:noNamespaceSchemaLocation=”../../../../lib/internal/Magento/Framework/Config/etc/theme.xsd”>
<title>Mageplaza Simple</title>
<parent>Magento/blank</parent>
</theme>
To create your theme folder go to app/design/frontend and create vendor folder pp/design/frontend/<vendor> e.g: app/design/frontend/Mageplaza
Then create a theme folder app/design/frontend/<vendor>/<theme> e.g: app/design/frontend/Mageplaza/simple
Declare Folder
After you have the folder app/design/frontend/Mageplaza/simple create a file with name: theme.xml. It has basic information about theme.
<theme xmlns:xsi=”http://www.w3.org/2001/XMLSchema-instance” xsi:noNamespaceSchemaLocation=”urn:magento:framework:Config/etc/theme.xsd”>
<title>Mageplaza Simple</title> <!– your theme’s name –>
<parent>Magento/blank</parent> <!– the parent theme, in case your theme inherits from an existing theme –>
<media>
<preview_image>media/preview.jpg
Distribute Your Theme As a Composer Package
To distribute it as a composer package, add a composer.json file to the theme directory, then register it on the package server.
Registrate the .PHP file
To do it enter the following content to register it.
<?php
/**
* Copyright © 2015 Magento. All rights reserved.
* See COPYING.txt for license details.
*/
\Magento\Framework\Component\ComponentRegistrar::register(
\Magento\Framework\Component\ComponentRegistrar::THEME,
‘frontend/Mageplaza/simple’,
__DIR__
);
Create a folder for static CSS and JS files
To get the best layout in the theme design there are many CSS, JS, files which are static including the images and the fonds.
They are stored in separate folders in web of theme package
app/design/<area>/Mageplaza/simple/ –> web/ –> static files(CSS, JS, Images, Fonts)
Configure Catalog Product Images
Locate to app/design/<area>/Mageplaza/simple/ and create a folder etc and file view.xml and copy the file
<image id=”category_page_grid” type=”small_image”>
<width>250</width>
<height>250</height>
</image>
Declare the Logo
The size of the logo needs to be 300x300px – open the file <theme_dir>/Magento_Theme/layout/default.xml
<page xmlns:xsi=”http://www.w3.org/2001/XMLSchema-instance” xsi:noNamespaceSchemaLocation=”urn:magento:framework:View/Layout/etc/page_configuration.xsd”>
<body>
<referenceBlock name=”logo”>
<arguments>
<argument name=”logo_file” xsi:type=”string”>images/custom_logo.png</argument>
<argument name=”logo_img_width” xsi:type=”number”>300</argument>
<argument name=”logo_img_height” xsi:type=”number”>300</argument>
</arguments>
</referenceBlock>
</body>
</page>
Resourses: www.mageplaza.com