
On This Page: [hide]
Deciding where to host your static website is a critical step that influences its performance, cost, and scalability. Amazon Web Services (AWS) Simple Storage Service (S3) stands out as a preferred choice for many, thanks to its blend of affordability, reliability, and user-friendly management.
This article dives into why AWS S3 is an excellent platform for hosting static websites, from its straightforward setup and cost-effective pricing structure to its scalable architecture. Whether you’re a solo developer or part of a larger organization, understanding the advantages of AWS S3 will equip you with the knowledge to make an informed hosting decision, setting the stage for your website’s success.
Why Choose AWS S3 for Your Static Website?
Choosing the right platform to host your static website can significantly impact its performance, cost-efficiency, and scalability. Amazon Web Services (AWS) Simple Storage Service (S3) offers a compelling hosting solution uniquely suited to static websites. Its blend of affordability, ease of use, and robust features makes it an excellent choice for individuals and businesses alike seeking to publish their static content online.
Comparing Hosting Options: Why S3 Stands Out
In the landscape of web hosting services, various options cater to different needs. Traditional web hosting services have long been the go-to solution for many. However, the rise of cloud storage services like AWS S3 has shifted the paradigm, especially for static websites. The inherent differences in architecture, pricing, and operation set AWS S3 apart as a preferable option in many cases.
Benefits of AWS S3 Over Traditional Web Hosting
Understanding the benefits of AWS S3 over traditional web hosting solutions can help you make an informed decision for your website needs. Here are some key advantages:
- Cost Efficiency: AWS S3 operates on a pay-as-you-go model, meaning you only pay for the storage and the requests your site generates. This can result in lower costs compared to flat-rate traditional hosting, especially for websites with fluctuating traffic.
- Scalability: S3 seamlessly scales to handle traffic spikes, so your website can accommodate a surge in visitors without the need for manual adjustments or fearing downtime.
- Reliability and Availability: AWS’s global infrastructure ensures high availability and durability for your static content, keeping your site accessible to users around the clock.
- Security: With AWS S3, you benefit from AWS robust security groundwork. Though you’re responsible for the security of your content, AWS provides tools and features to help safeguard your data.
- Simple Management: Hosting a website on S3 eliminates the need for managing servers or installing software, making it easier to deploy and maintain your site.
Overall, AWS S3 offers a hassle-free approach to web hosting for static sites. Its cost-efficiency, reliability, and scalability make it a strong candidate for anyone looking to launch a website efficiently. With the added advantages of security and simplicity in management, S3 allows developers and content creators to focus on delivering quality content without the burden of technical complexities.
What You Need Before Getting started with AWS S3
Before diving into the world of hosting your website with Amazon Simple Storage Service (AWS S3), there are some essential tools and accounts you need to set up. AWS S3 offers a reliable and secure way to host your static website, but proper setup is key to ensuring your site runs smoothly and is protected against unauthorized access. Here’s what you need to get started:
Essential Tools and Accounts for AWS S3 Hosting
Begin by securing an AWS account, which will serve as your entry point to not only AWS S3 but also the vast array of services offered by Amazon Web Services. This account will be your administrative hub, allowing you to manage S3 buckets, set up Identity and Access Management (IAM) users, and oversee permissions and policies for secure access to your website files.
Securing an AWS Account and Setting Up IAM Users
The first step is to sign up for an AWS account if you don’t already have one. This account is critical for accessing the AWS Management Console, where you’ll manage your S3 buckets and configure settings. Once your AWS account is active, your next task is to set up IAM users. IAM users are individual user accounts that you can create within your AWS account to manage access permissions. Here’s how you can secure your AWS account and effectively use IAM:
- Create Strong Login Credentials: Ensure that your AWS account is protected with strong login credentials. Use a secure and unique password combined with multi-factor authentication (MFA) for an added layer of security.
- Set Up IAM Users: Instead of using your AWS account root user for day-to-day tasks, create IAM users for anyone who needs access to your AWS account. Assign them only the permissions they need to fulfill their roles. This practice is known as the principle of least privilege and is fundamental to secure AWS usage.
- Group Assignment: Organize IAM users into groups and assign permissions to these groups. This makes managing permissions for multiple users more straightforward and reduces the risk of accidental permission oversights.
- Use Access Keys Cautiously: For programmatic access, such as deploying website files to your S3 bucket via scripted commands, IAM users will need access keys. Treat these keys as sensitive information—similar to passwords—and rotate them regularly.
- Review and Audit Permissions Regularly: Periodically review your IAM users’ permissions to ensure they have access only to the resources they need. This check is crucial for maintaining the security of your S3-hosted website.
In conclusion, securing your AWS account and properly setting up IAM users are critical initial steps in your AWS S3 hosting journey. By following these guidelines, you’ll ensure that your website is not only accessible and reliable but also secure from potential threats.
Setting Up Your First S3 Bucket for Web Hosting
Hosting a static website on Amazon S3 is a budget-friendly and efficient way to make your website accessible to a global audience. This guide simplifies the process, ensuring your first foray into web hosting on AWS S3 is straightforward and successful. By following these steps, your website will be live and accessible in no time, without the need for complex server management.
How to Create and Configure Your S3 Bucket
Amazon S3 allows users to store and retrieve any amount of data at any time, making it a perfect solution for hosting static websites. Static websites are great for blogs, portfolios, and small business websites as they require less server-side processing.
Naming Your S3 Bucket: Best Practices
The name of your S3 bucket plays a crucial role in how easily your website is accessed. Hence, it should match your domain name. For example, if your domain is “www.example.com,” your S3 bucket should also be named “www.example.com.” This alignment ensures that when your domain name is searched, AWS can efficiently route the request to the corresponding bucket. Keep in mind that bucket names must be unique globally, so pick a distinctive, relevant name for your website.
Permissions and Policies: Making Your Site Public
Configuring your bucket to be accessible to the internet involves adjusting permissions and setting up policies correctly. Subject to AWS’s default settings to prevent unauthorized access, these adjustments ensure your website is visible to your audience while maintaining security against unwanted access.
Understanding Bucket Policies and IAM Roles for Website Access
To make your S3 bucket content publicly available, you need to edit its bucket policy. The policy specifies who can access your bucket and what actions they can perform. For a static website, the essential policy allows public read access so that users can view your site. Here’s a simplified breakdown:
- Navigate to the Permissions tab in your bucket settings.
- Locate the Bucket Policy section and insert a policy that grants public read access. This typically includes the action “s3:GetObject” with the principal set to “*,” which symbolizes everyone.
- Confirm the changes to make your website accessible to anyone on the internet.
It’s essential to be conscious of the type of information you host on a publicly accessible bucket. Avoid storing sensitive or private data unless it is adequately secured. Implementing IAM roles can grant more granular access control for administration purposes, enabling you to manage your site more securely and effectively.
Configuring Your S3 Bucket for Static Website Hosting
Setting up your Amazon S3 bucket for static website hosting is a straightforward process that can significantly enhance your web presence. Whether you’re hosting a blog, a personal portfolio, or a business page, S3 provides a reliable and scalable solution. Here, we’ll walk through the essential steps to turn your S3 bucket into a fully functional website.
Step-by-Step: Enabling Static Hosting on Your Bucket
Enabling static website hosting on your Amazon S3 bucket involves a series of simple steps:
- Sign in to the AWS Management Console and navigate to the Amazon S3 console.
- Choose the bucket you intend to use for your website.
- Click the Properties section, then find and click Static website hosting.
- Select the option “Use this bucket to host a website.
- Enter “index.html†in the Index document field. This tells S3 which document to serve as the home page of your website.
- If needed, set a custom error document, like 404.html, for handling HTTP errors.
- Save your changes. Amazon S3 will now host your static website, providing you with a unique URL to access it.
This process doesn’t only make your website accessible via a simple URL but also sets the stage for custom domain integration. Remember, for broader access, make sure to adjust your bucket permissions to allow public access after carefully assessing any security implications.
Custom Error Pages and Redirect Rules for a Better User User Experience
Custom error pages and redirect rules are key ingredients in crafting a smooth, user-friendly web experience. They guide visitors through your site, improving navigation and ensuring that users can find what they’re looking for, even when they encounter a broken link or an unavailable page.
- Custom error pages: By creating a personalized error page, such as 404.html, you communicate with your visitors in a friendly manner when they request a page that doesn’t exist. This is not only helpful but also maintains your site’s aesthetic even in error conditions.
- Redirect rules: Redirects are useful for sending visitors to new page locations automatically, especially if you’ve moved content. They can also enhance site navigation and structure, making your website more dynamic and interactive. For instance, you can set rules to redirect users based on specific conditions, like their browser language or device type.
By thoughtfully combining these elements, you can significantly improve how users interact with your site, turning potential frustration into a positive user experience. Amazon S3’s hosting features allow you to implement these customizations easily, ensuring that your static site remains user-centric and engaging.
Uploading Your Website Files to AWS S3
When you’re ready to make your static website live to the world, Amazon Simple Storage Service (Amazon S3) provides a reliable and cost-efficient way to host it. The following sections will guide you on effectively uploading your website files to an AWS S3 bucket, ensuring your site is accessible and renders correctly for your audience.
Effective Methods for Uploading Static Files and Folders
Amazon S3 stores data as objects within buckets. An object consists of a file and optionally any metadata that describes the file. Despite appearing to support a folder structure, S3 fundamentally treats every file as an object with a unique identifier or key. While this might seem like a minor detail, it’s crucial for understanding how to organize and upload your site’s files correctly.
Two primary methods are available for uploading your website’s static files and folders to AWS S3: through the AWS Management Console or using the AWS Command Line Interface (CLI). The method you choose can depend on your preference for a graphical interface or command-line operations. Below, we explore both approaches to ensure you can select the one that best fits your workflow.
Automating Uploads with AWS CLI: A Quick Tutorial
The AWS Command Line Interface (CLI) offers a powerful way to automate uploading your website content to S3. With a single command, you can upload entire directories, making it an efficient choice for batch uploading or regular updates to your site. Here’s a simplified guide to get you started:
- First, ensure that the AWS CLI is installed and configured on your computer. If you haven’t done this yet, you can find the necessary steps in the AWS documentation.
- Open your command prompt or terminal.
- Navigate to the directory containing your website’s files and folders.
- Use the AWS S3
synccommand to upload your content. For example:aws s3 sync . s3://your-bucket-name --acl public-read
This command synchronizes the contents of your current directory (denoted by the period) with your S3 bucket. The--acl public-readoption makes all uploaded files publicly readable, which is usually necessary for web hosting.
The AWS CLI method is beneficial for developers and those comfortable with command-line tools, offering speed and flexibility, especially for large websites or frequent updates.
Both methods, whether using the graphical interface of the AWS Management Console or the versatility of the AWS CLI, serve the same purpose: to get your website up and running on AWS S3. Choosing the right approach largely depends on your personal or project’s needs. Regardless, AWS S3’s scalability and reliability make it an excellent choice for hosting static websites.
In summary, uploading your website files to AWS S3 involves organizing your files correctly and choosing an upload method that suits your workflow. Whether you prefer the straightforwardness of the AWS Management Console or the efficiency and automation of the AWS CLI, AWS S3 can serve your static website hosting needs effectively.
Linking Your Domain to the S3 Website Endpoint
Setting up a website can seem like a complex task, but when broken down into manageable steps, it becomes much easier. One of the crucial steps in making your website accessible to the public is linking your domain name to your Amazon S3 website endpoint. This process involves updating DNS records to point your custom domain to the S3 bucket where your website files are stored. By carefully following these instructions, you can make your site live and accessible worldwide.
Registering and Configuring a Domain with Route 53
Amazon Route 53 serves as a robust DNS web service designed for developers and businesses to manage their domains. If you’ve purchased your domain through Amazon, a hosted zone will automatically be created. This is convenient because it simplifies the process of linking your domain to various AWS services, including Amazon S3 for website hosting. If your domain was purchased elsewhere, don’t worry. The first step is to create a hosted zone in Route 53 for your domain, ensuring it’s set up to manage your DNS records efficiently.
Once your hosted zone is ready, you’ll need to update the Name Server (NS) records at your domain registrar to the NS records provided by Amazon Route 53. This step is critical because it tells the internet where to find the DNS information for your domain. It may take up to 24 hours for these changes to take effect due to DNS propagation, a necessary phase where DNS servers worldwide update their cached information about your domain.
Connecting Your Domain to S3: DNS Settings Explained
The final link in the chain of making your static website live is to connect your domain to your S3 website endpoint. This connection is established through a DNS record known as a CNAME (Canonical Name) record or an Alias record. These records essentially direct traffic heading for your domain to your S3 bucket, where your website content is hosted.
- CNAME Record: This DNS record type is used to point your domain (e.g., www.example.com) to the S3 website endpoint URL. It’s like telling the internet, “Hey, when someone tries to visit my website, take them to this location instead.” CNAME records are typically used for subdomains like www.
- Alias Record: Amazon Route 53 offers a slightly different type of record called an Alias record. This record type allows you to point your root domain (e.g., example.com without the www) directly to your S3 website endpoint. Alias records work similarly to CNAME records but are specifically designed to integrate seamlessly with other AWS resources.
For most, adding a CNAME record for the www version of your domain and an Alias record for the root domain provides a comprehensive strategy, ensuring that visitors can access your website with or without the www prefix. After updating your DNS settings, your custom domain will start directing visitors to your S3 hosted website. Keep in mind, changes to DNS records can take some time to propagate throughout the internet. Patience is key during this transition period.
In today’s interconnected world, ensuring your website is easily accessible and secure is paramount. As your site becomes publicly accessible, consider integrating security measures to protect against unwanted threats.
Securing Your Static Site with HTTPS
Ensuring the security of your website is not just an added benefit; it’s a necessity in today’s online space. HTTPS, which stands for HyperText Transfer Protocol Secure, encrypts the data between your website and its visitors, protecting sensitive information from potential threats. For websites hosted on Amazon S3, leveraging HTTPS is critical to safeguard user data and enhance trustworthiness among users.
Why SSL/TLS is Essential for Your AWS S3 Hosted Site
Implementing SSL/TLS certificates for your website translates to encrypting data in transit, making it nearly impossible for hackers to intercept and decipher user information. This security measure is especially vital if your site handles sensitive data, such as login details, personal information, or financial transactions. Moreover, search engines like Google prioritize secure websites in their rankings, making SSL/TLS not just a security feature but also a booster for your site’s visibility. Lastly, displaying a security certificate creates a sense of reliability, encouraging users to interact more freely with your content.
Acquiring and Implementing SSL/TLS Certificates with AWS
Acquiring and implementing an SSL/TLS certificate for your AWS S3 hosted site involves a few straightforward steps. First, log in to your AWS Management Console and navigate to the AWS Certificate Manager (ACM). It’s notable that ACM provides SSL/TLS certificates at no extra cost for use with AWS services like Amazon CloudFront. Begin by requesting a public certificate, following the guided process which includes detailing your domain name. After ACM has approved your certificate request, the next step is integrating it with your Amazon S3 content, typically done through Amazon CloudFront, a content delivery network (CDN) that securely delivers your content with low latency and high transfer speeds.
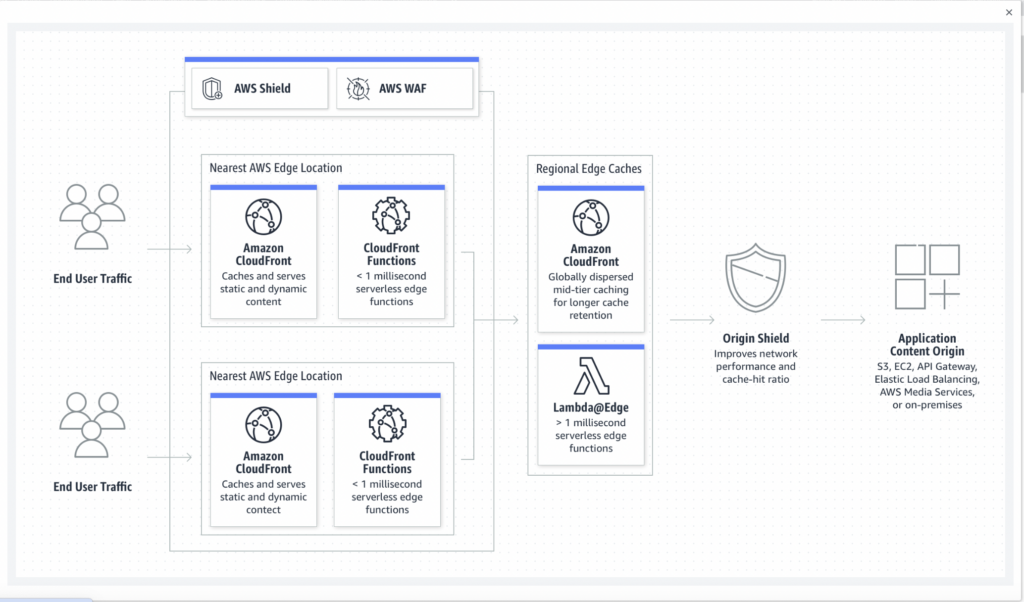
To connect your SSL certificate with CloudFront, create a new distribution and select your newly certified domain name as the origin. Ensure the distribution settings are configured to redirect all HTTP requests to HTTPS, enforcing secure connections for all site visits. After configuring CloudFront to use your ACM certificate, your static site will be set to serve content securely over HTTPS. This not only secures your site but significantly enhances user trust and site credibility.
Optimizing and Monitoring Your S3 Hosted Website
Once your website is up and running on Amazon S3, the next step is to ensure it operates efficiently. Optimizing and monitoring your site can seem overwhelming, but by following these recommended tools and practices, you can improve performance and provide a better user experience.
Tools and Practices for Enhancing Site Performance
Optimizing your websites performance involves several strategies, from minimizing file sizes to leveraging browser caching. These practices are crucial for ensuring that your site loads quickly, which in turn can help with search engine rankings and user satisfaction.
- Minify CSS and JavaScript: This process reduces the file size of your CSS and JavaScript files by removing unnecessary characters without changing their functionality.
- Image Optimization: Compress images without compromising their quality to decrease the time it takes for your pages to load.
- Use Amazon CloudFront: Implementing a Content Delivery Network (CDN) like CloudFront can drastically improve the delivery speed of your content by caching it in multiple locations around the world.
These steps not only enhance site performance but also contribute towards reducing the cost associated with bandwidth usage.
Monitoring Access and Errors: Using AWS CloudWatch for Insight
A crucial aspect of maintaining an optimized website is regular monitoring for any access issues or errors that could affect user experience. AWS CloudWatch offers a comprehensive solution for tracking the health and performance of your S3-hosted site.
- Access Logs: Keep an eye on who is accessing your site and from where. This can help you understand your audience better and detect any unauthorized access attempts.
- Error Tracking: Monitor and analyze error rates. High error rates could indicate problems with your site that need immediate attention.
- Performance Metrics: Use CloudWatch to track metrics like page load times and server response times. These metrics can help you identify the bottlenechn ks in your website’s performance.
While setting up CloudWatch, refine your alerts to ensure you’re notified of critical issues that need your attention. Regularly reviewing these metrics and logs can help you preemptively address potential problems, ensuring your site remains secure and operational.
Common Challenges and Solutions in S3 Website Hosting
Hosting your website on Amazon S3 is a fantastic way to ensure scalability, reliability, and lower costs. However, users often encounter specific hurdles that can seem challenging at first. Let’s explore some of the most common issues and how to solve them effectively.
Dealing with Common Configuration Errors
Getting your static website up and running on Amazon S3 can present a few configuration roadblocks. These issues typically revolve around permissions, bucket policies, or incorrectly set up static website hosting options. Understanding these common pitfalls can save you time and frustration.
Solutions for Frequent S3 Static Site Hosting Issues
Encountering problems while setting up or managing your S3 bucket for website hosting can be daunting. Here’s how to address some of the most frequent issues:
- Bucket Permissions: One of the first stumbling blocks can be ensuring your S3 bucket is publicly accessible for it to serve your website files. This entails modifying the bucket’s permissions and making sure that the ‘Block Public Access’ settings are turned off. Remember to proceed with caution and only make public the necessary files to avoid exposing sensitive data.
- Static Website Hosting Configuration: Another common issue is not configuring the bucket for static website hosting correctly. Ensure that you select “Use this bucket to host a website” in the bucket properties and set the index document (usually index.html) and the error document (such as error.html). This step is crucial for your site to be served correctly and handle errors gracefully.
- Bucket Policy: The bucket policy needs to be set to allow public read access for anyone to view your website. This policy specifies who can access your bucket and what actions they can perform. A well-crafted bucket policy will enable the public to read the content of your site without compromising security.
- CNAME Records: If you’re using a custom domain, configuring CNAME records can be tricky. Ensure your domain’s DNS settings include a CNAME record pointing to your S3 bucket URL. This connection is vital for your custom domain to resolve to your S3 hosted website.
While addressing these issues, it’s crucial to balance accessibility and security. Public accessibility is necessary for your website to be reachable by your audience, but it’s equally important to secure your S3 bucket to prevent unauthorized access.
By tackling these common challenges head-on with the solutions provided, you can ensure a smoother, more secure operation of your S3-hosted static website. Whether it’s adjusting permissions, configuring your bucket for website hosting, or setting up a custom domain, these steps will help you create a reliable and accessible online presence.
Troubleshooting: When Your S3 Static Site Doesn’t Work
Encountering issues with your Amazon S3 static website can be frustrating. However, most problems have straightforward solutions. This section will guide you through common troubleshooting steps to get your website up and running smoothly again.
Diagnostic Steps to Resolve S3 Hosting Problems
If your S3 hosted website isn’t displaying as expected, don’t worry. By following these diagnostic steps, you can identify and solve the issue efficiently:
- Check Bucket Permissions: Ensure your S3 bucket has the correct permissions. The bucket policy should allow public read access to host a static website.
- Verify Static Website Hosting is Enabled: Make sure static website hosting is activated for your S3 bucket. This setting is crucial for serving your website’s files to visitors.
- Review Object File Permissions: Each file (or object) stored in your S3 bucket needs to be publicly accessible. Check the permissions of each object and adjust them if necessary.
- Inspect the Bucket Policy: A correctly configured bucket policy is essential for your website to be public. Confirm that your bucket policy matches the recommended settings provided by AWS.
- Ensure Correct Index Document Settings: Your bucket static website hosting setting should specify “index.html” as the index document unless your main page is named differently.
- Use the Correct URL: S3 static website URLs follow a specific pattern. Double-check you’re using the correct endpoint URL for your website.
Following these steps should resolve most issues with accessing or displaying your S3 hosted website.
Ensuring Security Without Compromising Accessibility
While making your website available to the public, it’s critical to maintain security. Here are tips to secure your S3 static website without hindering its accessibility:
- Restrict Bucket Permissions Wisely: Enable public read access specifically for web content. Avoid giving write access or any other permissions that are not required.
- Use IAM Policies for Fine-grained Control: Implement AWS Identity and Access Management (IAM) policies to manage permissions meticulously. This allows precise control over who can access your S3 resources.
- Enable Logging: Monitor access and requests to your S3 bucket by enabling AWS logging. This can help you identify and react to unauthorized access attempts.
- Consider Using CloudFront: For added security, consider delivering your content through Amazon CloudFront. CloudFront provides HTTPS support for your static website, enhancing its security against common cyber threats.
By following these steps and maintaining a balance between accessibility and security, you can host a successful and secure static website on Amazon S3.
Conclusion: Maximizing the Allure of Your S3 Hosted Static Site
In today’s fast-paced digital environment, launching a static website using Amazon S3 offers a surprisingly simple yet powerful solution for creators and businesses alike. Embracing the potential of S3 for hosting static pages not only signifies a cost-effective strategy but also opens the door to enhanced performance, reliability, and scalability. By concentrating on a few critical areas, you can transform your static S3-hosted site from a simple web presence into a robust platform that captivates your audience and elevates your online footprint.
First and foremost, optimizing for SEO should be a top priority. While your site’s static nature might seem limiting at first glance, the reality is quite the opposite. With the right strategy, including keyword-rich content and SEO-friendly URLs, your S3-hosted site can achieve impressive search engine rankings. Furthermore, integrating analytics tools can help you understand visitor behavior, enabling you to tailor your content and design to better meet your audience’s needs.
Additionally, leveraging the power of a Content Delivery Network (CDN) can drastically improve your site’s loading times across the globe. By distributing your content across a network of servers, you ensure that users, no matter where they are, experience speedy access to your website. This not only enhances user satisfaction but also positively impacts SEO, as faster sites are favored by search engines.
Finally, remember that your website’s attractiveness and user-friendliness play significant roles in retaining visitors. Employing a responsive design ensures that your site looks great and functions flawlessly on any device, from desktops to smartphones. Regularly updating your content keeps it fresh and engaging, encouraging visitors to return.
To sum up, hosting your website on Amazon S3 offers an array of advantages that extend far beyond just affordability and simplicity. By focusing on SEO, security, global reach through CDNs, and a seamless user experience, you can leverage this powerful platform to its fullest potential. Embarking on this journey equips you with the tools necessary for success in the digital realm, paving the way for a vibrant and dynamic online presence.