


On This Page: [hide]
![]()
Nexcess is a hosting company that has over 18 years of hosting experience. It serves the needs of over 50,000 customers and it has data centers in the USA, the Netherlands, Australia, and the UK. It offers Cloud hosting as well as shared hosting and WordPress hosting services.
Nexcess.com
| Targeting Locations | US, UK, AU |
| Price Range | Cloud Hosting Services – 49$, 99$, 179$, 299$, 549$, 849$ per month; WordPress Pricing – 19$, 79$, 149$, 299$, 549$, 999$ per month |
| Products | WordPress, Cpanel, Website Builder, Account manager, Backups, unlimited emails |
| Support | 24/7 email support |
| Suitable for | WordPress, Online Stores, Commercial websites, Big ecommerces |
START Your Website NOW! Get LiquidWeb Hosting Plan for Your Website Here.
Also Read How to Install WordPress With PuTTy and FileZilla
How to install WordPress on Nexcess
Nexcess does not offer a 1-click WordPress installation process, but yet installing a WordPress is quite an easy thing to do.
In this installation guide, we are going to show you how to install Nexcess in the proper way on 4 easy steps.
1. Download WordPress
2. Set up Databace
3. Upload Files With FTP
4. Instalation Process
Step 1 (Download WordPress)
To start with, you have to download the last official WordPress release to your computer. You can do it from https://wordpress.org/download/.
Unzip or extract the files in a folder of your computer.
Step 2 (Set Up The Database)
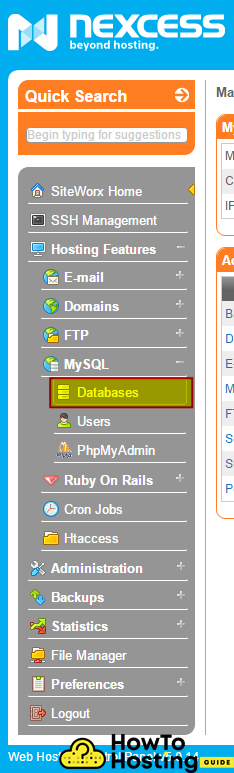
After you’ve downloaded your WordPress archive, you have to set up your database with SiteWorx. From the PHPMyAdmin from your SiteWorx account, go to Hosting Features -> MySQL -> Databases
Then in the Database name, type a name for your new database. It is preferred not to use spaces or any special characters.
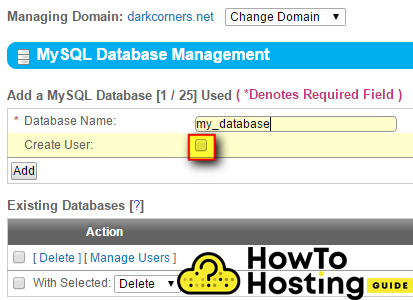
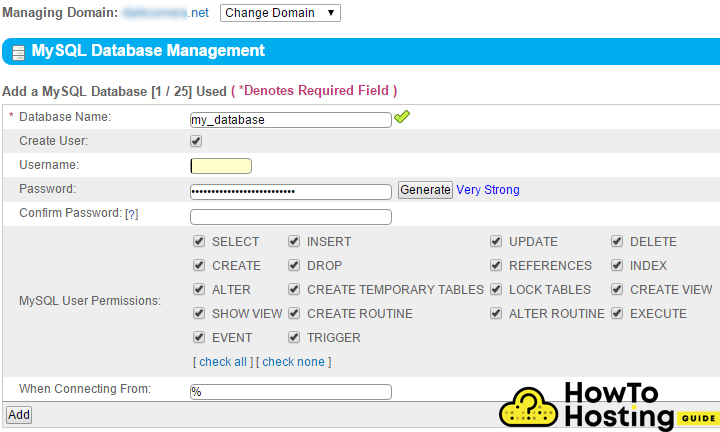
on the next Menu, you will see some options regarding your database permissions. Check all of them, type a strong password and click “add”
Step 3 (Upload Files With FTP)
After you’ve set your database, you have to upload your WordPress files to your hosting account. Have in mind that you do not have to upload the folder itself, but the files inside it. To do that, download any FTP software such as FileZilla for example, and with it connect to your hosting.
Then, you will see a folder called “HTML“. Open it and upload all of your WordPress files inside.
Step 4 (Installation Process)
After you have uploaded all of your WordPress files to your hosting, you should try to enter your website with its URL, but instead of your domain name, type “yourdomain.com/wp-admin/install.php.” This will activate the WordPress installer and you will have to enter your site title, log in information, and your email address, as well as some information regarding your database. When you fill all of the fields, click on the Install WordPress and wait for your installation to be completed.
Here you can find extra tips:
How to create your first blog in proper way
How to install wordpress with PuTTy and FileZilla
Why you have to use shared hosting for your first website